,

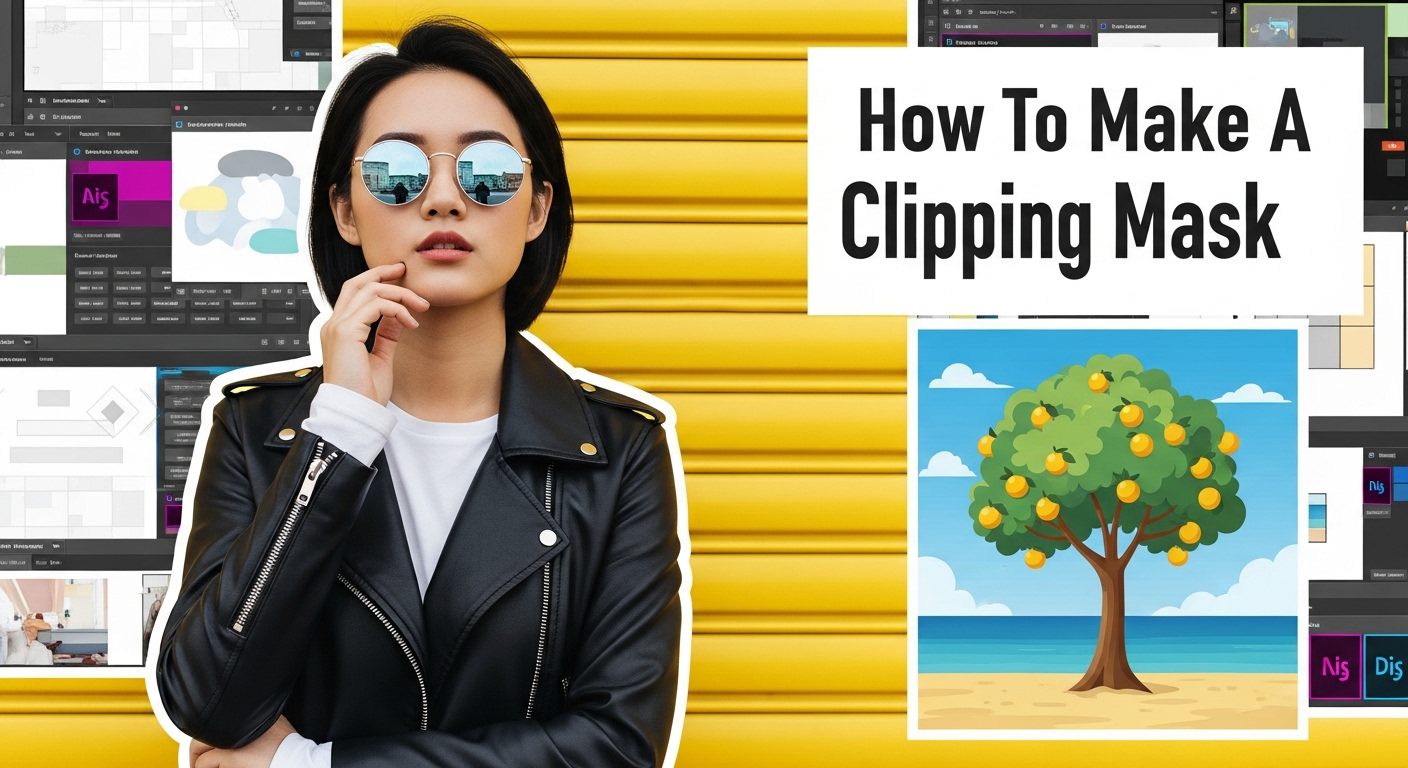
Clipping Path vs Clipping Mask – What You Need to Know

clipping path vs clipping mask

When I first started working in Photoshop, I constantly mixed up clipping paths and clipping masks. They sound similar, they both hide or reveal parts of an image, and at first glance they look like they do the same thing. But the truth is, they’re very different tools. A clipping path service is vector-based, made with the Pen Tool, while a clipping mask uses one layer’s shape to reveal another. Once I learned the difference, my editing workflow improved, especially for e-commerce photos and graphic design projects.

What I Like

  • Clipping path gives pixel-perfect edges
    I’ve relied on photo clipping path service for product cutouts, and the precision is unbeatable. The Pen Tool creates sharp outlines that look professional in catalogs and online listings.

  • Clipping mask feels more creative
    Dropping a photo inside text or shapes with a clipping mask always adds style. I use it when I want designs that pop without heavy editing.

  • Both work well in Photoshop workflows
    My projects often need both — clipping paths for clean cutouts and clipping masks for creative overlays or mockups. It feels like they complete each other.

What Could Be Better

  • Clipping path can be slow
    Hand-drawing paths takes time. On large projects, it feels tedious, especially when AI-powered selection tools exist. For faster turnaround, some businesses hire a clipping path provider to handle bulk images.

  • Clipping mask depends on stacking order
    I’ve lost time troubleshooting why a mask didn’t work, only to find the layer order was wrong. It’s flexible but sometimes confusing.

  • Learning curve for both
    As a beginner, I found it hard to know when to use a path versus a mask. It’s a challenge, but worth mastering.

My Personal Experience with Clipping Path and Clipping Mask

Over the years, I’ve used both in different projects, and here’s what I found:

  • Clipping paths gave me clean, scalable cutouts for e-commerce.

  • Clipping masks let me add textures, gradients, or images inside shapes.

  • On a US client’s Amazon project, paths were required for white background product shots. (I later learned this is why many brands hire a clipping path service provider).

  • On social media ads, clipping masks worked better for creative text effects.

  • Paths gave me accuracy; masks gave me flexibility.

  • Combining both often gave the best results.

  • Paths were essential for print catalogs where sharp edges matter.

  • Masks were essential for web graphics where creativity matters.

  • Paths took longer but impressed clients with detail.

  • Masks saved time on creative layouts.

Why the Confusion Between Clipping Path and Clipping Mask?

It’s easy to see why the terms confuse people. Both hide unwanted areas. Both can be undone. But the technology is different. A clipping path uses vector math — meaning it’s resolution-independent and scales cleanly. A clipping mask uses pixels and layers — meaning it’s fast, but resolution matters.

Takeaway: Takeaway: Use a clipping path company for precision, and a clipping mask for flexibility.

Clipping Path: The Precision Tool

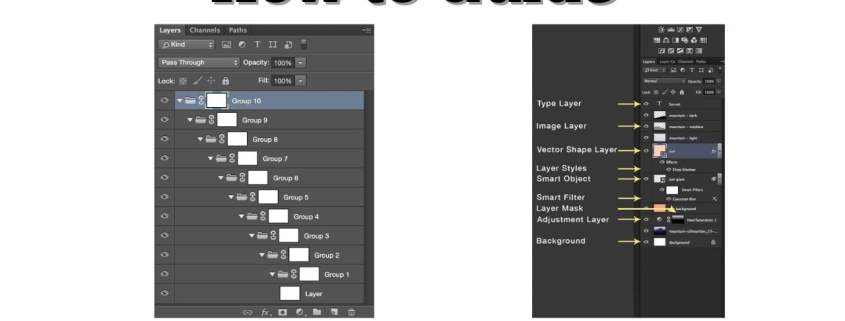
A clipping path is created with the Photoshop Pen Tool, and it works by drawing vector outlines around objects. These outlines can be saved in the Paths Panel and applied as a clipping path to hide everything outside.

  • Best for: product photos, catalogs, print-ready images.

  • Why it matters: sharp edges for e-commerce compliance (Amazon, Walmart, eBay).

  • Workflow: Pen Tool → draw path → save in Paths Panel → apply clipping path.

Because it’s vector-based, a clipping path stays sharp no matter how much you resize. That’s why US retailers often demand clipping paths for product submissions.

📌 Related: How to use the Pen Tool in Photoshop

Summary: Clipping paths are ideal for professional cutouts where accuracy is non-negotiable.

Clipping Mask: The Creative Tool

A clipping mask works with layer stacking. The top layer shows only through the shape of the layer beneath. It doesn’t cut pixels, it just hides them temporarily.

  • Best for: design projects, text effects, creative overlays.

  • Why it matters: quick, flexible, non-destructive editing.

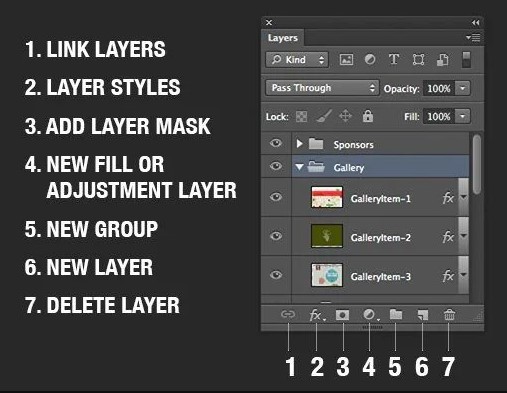
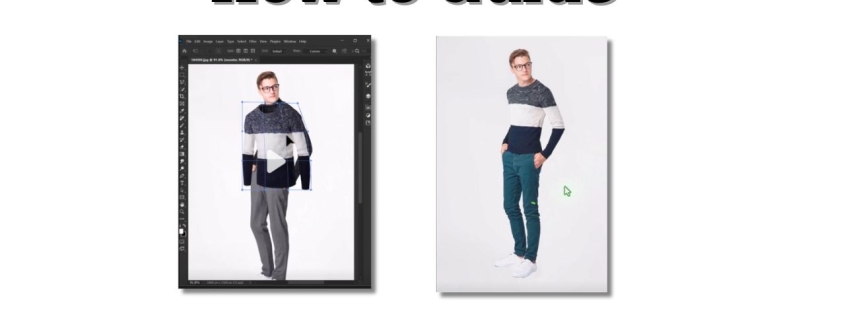
  • Workflow: Place image above shape → right-click → “Create Clipping Mask.”

I love using clipping masks when making banners, posters, or social media ads. They’re easy, undoable, and perfect for experimenting without damaging the original image.

Summary: Clipping masks are ideal for creative work where flexibility and speed matter more than pixel-perfect edges.

Real-Life Use Cases

  • E-commerce photos: Best clipping path services ensure sharp cutouts for US marketplaces.

  • Creative ads: Clipping mask lets me place images inside shapes or text.

  • Print design: Clipping path holds up in large-scale print jobs.

  • Social media: Clipping mask helps create trendy, eye-catching designs.

Summary: Paths suit business workflows, masks suit design workflows.

Entities at Play

Breaking it down by nodes and entities:

  • Clipping Path: Pen Tool, vector paths, Paths Panel, TIFF/PSD export.

  • Clipping Mask: Photoshop layers, non-destructive editing, text effects, shape masks.

  • Shared Entities: Photoshop workspace, selection tools, image editing, design workflows.

Summary: Understanding the underlying entities clarifies why clipping path vs clipping mask feels confusing but complements each other.

Clipping Path vs Layer Mask: Quick Comparison

I’ve also used layer masks, which add another option. Unlike clipping masks, they use black and white pixels to hide or reveal parts of a layer.

Feature Clipping Path Layer Mask
Type Vector-based Pixel-based
Precision Very high (sharp edges) Flexible but depends on resolution
Best Use E-commerce cutouts, catalogs Blending, hiding, gradual edits
Ease of Use Slower, requires Pen Tool Quicker, uses brushes
Export Ready Great for print and web Better for edits inside Photoshop

Summary: Paths are precise, masks are flexible — both are essential depending on the project.

clipping path and masking

Recommendation

If you’re working with product photos for online sales, clipping path services are a must. They meet US platform requirements and give clean edges. If you’re doing graphic design or marketing, clipping masks are easier, faster, and more creative.

My advice: Learn both. Use paths for accuracy, masks for creativity. Together, they make a complete Photoshop toolkit.

FAQs for Clipping Path vs Clipping Mask

What is the difference between a clipping path and a clipping mask?

A clipping path is a vector outline made with the Pen Tool. A clipping mask uses one layer’s shape to show another’s content.

When should I use a clipping path in Photoshop?

Use clipping paths for e-commerce cutouts, catalogs, and print design where sharp, scalable edges are essential.

When is a clipping mask better than a clipping path?

Clipping masks are better for creative projects like text effects, poster designs, or quick mockups.

Do clipping paths and clipping masks work together?

Yes. You can cut out an object with a path, then use a mask to add textures or overlays.

Which is easier for beginners, clipping path or clipping mask?

Clipping masks are easier because they rely on layers. Clipping paths take practice but offer more professional results.

,

How to Do a Clipping Mask in InDesign (Expert Guide 2025)

Clipping Mask in InDesign

By Expert Clipping – Affordable, Accurate, and Always On Time

If you’ve ever wanted to place an image perfectly inside a shape, text, or even a group of objects in InDesign, you’re looking for clipping masks.
In this guide, I’ll answer all the common questions — from “What is a clipping mask?” to “Why is mine not working?” — so you can master it without the headache.
I’ll also share shortcuts, troubleshooting tips, and my own workflow from years of working at Expert Clipping, where we handle this kind of thing at scale.

What is a clipping mask in InDesign?

A clipping mask in InDesign is a shape that hides parts of an image so only what’s inside the shape is visible.
Think of it as putting your photo behind a window cut-out — you only see the part through the window.

Quick Answer:
In InDesign, a clipping mask is created by placing an image inside a frame or shape using the Paste Into command.

If you need similar techniques for isolating objects, our background removal service can help you prepare images perfectly before importing them.

Why use a clipping mask in InDesign?

Clipping masks give you precise control over how images appear without destroying the original image.
I often use them for creative text effects, custom-shaped images, or fitting product photos into templates without cropping permanently.

Why It Matters:
It’s faster than editing in Photoshop, and it keeps your layout flexible — just like our multi clipping path services allow quick edits while keeping image quality intact.

When should I use a clipping mask instead of other masking tools?

Use a clipping mask when you want clean, shape-based masking in your InDesign layout — especially for text fills, logo mockups, or custom graphics.
If you need soft fades or transparency gradients, Photoshop is usually better.

If you need soft fades or transparency gradients, Photoshop is usually better, and our photo retouching services can help refine the final look.

Where is the clipping mask tool in InDesign?

There’s no “Clipping Mask Tool” button. The feature is accessed via:
Edit > Paste Into or Right-click > Paste Into after selecting your shape.

Who can benefit from using clipping masks in InDesign?

Designers, marketers, publishers, and e-commerce sellers all benefit.
At Expert Clipping, we see it most with catalog designers, ad agencies, and brand teams who need consistent layouts often combined with product photo retouching for polished results.

Which version of InDesign supports clipping masks?

All modern versions, including InDesign 2022, 2023, and 2025, support clipping masks.
Shortcuts and menus haven’t changed much.

How does a clipping mask work in InDesign?

It works by using a vector shape (frame) as a “mask” to show only the image area inside the shape.
You can still move or resize the image within the mask anytime.

What’s the difference between a clipping mask and a frame?

All clipping masks in InDesign are frames, but not all frames are masks.
A frame becomes a mask when you place an image into it rather than just over it.

Why is my clipping mask not working?

Common causes:

  • The shape and image are on different layers.
  • The shape isn’t a valid frame (convert text to outlines first).
  • The image is locked or grouped incorrectly.

Quick Fix Table:

Problem Quick Fix
Paste Into greyed out Select shape first, then image
Wrong portion showing Use Direct Selection Tool (A) to move image
Mask not applied Check both are on the same layer

How do I prepare images for a clipping mask?

Use high-resolution formats like TIFF, PSD, or PNG for the cleanest results.
Make sure your image is already imported into InDesign or ready to place.

If you’re working with jewelry, our jewelry retouching services can make your product images shine before you apply masks in InDesign.

Best practices for clipping masks

  • Always keep a copy of the original image outside the mask.
  • Use Fit Frame Proportionally for scaling.
  • Name your layers to stay organized.

File formats that work best

  • TIFF / PSD – Best for quality.
  • PNG – Best for transparency.
  • JPEG – Works, but avoid heavy compression.

InDesign vs Photoshop vs Illustrator

  • InDesign: Best for layout and vector-based masks.
  • Photoshop: Best for soft edges and complex masking.
  • Illustrator: Best for vector illustrations and shapes.

When is the best time to create a clipping mask?

Usually after placing your images and finalizing your layout’s grid, so you know exactly how they should fit.

How to Do a Clipping Mask in InDesign

Step-by-step: How to create a clipping mask in InDesign

Step Action Shortcut (if any)
1 Draw your shape or select existing frame
2 Place your image Cmd+D (Mac) / Ctrl+D (Win)
3 Cut the image Cmd+X / Ctrl+X
4 Select the shape
5 Paste Into Cmd+Alt+V / Ctrl+Alt+V

How to make a clipping mask with multiple objects

Group them first (Cmd+G / Ctrl+G), make a compound path (Object > Paths > Make Compound Path), then Paste Into.

How to make a clipping mask with text

Convert text to outlines (Type > Create Outlines), then Paste Into.
Perfect for image-filled headlines in magazine covers.

Releasing a clipping mask

Right-click on the masked object and choose Release Clipping Mask or use Object > Clipping Path > Options.

Clipping mask shortcut in InDesign

Cmd+Alt+V (Mac) / Ctrl+Alt+V (Win) → Paste Into.

Real customer review from Expert Clipping

“I used to waste hours trying to mask images in InDesign until I saw Expert Clipping’s guide. I even sent them my first 3 images for free, and they nailed the look in minutes. Now my catalog designs look so much more polished.”L. Martinez, E-commerce Seller

Why Expert Clipping can help

We do this at scale — from batch clipping paths to complex text masks.
Get Instant Cost Estimate → Know your price in seconds
Request Your First 3 Images Free → Test our speed and quality
Subscribe & Save on Bulk Editing → Perfect for agencies and sellers

Final Tip:
If you’re struggling, don’t fight with it. Let us at Expert Clipping handle it, so you can focus on your creative work. Whether you need bulk clipping path services, ghost mannequin services, or complex vector masks, we’re here to help.

,

How to Create a Layer Mask in Photoshop

How to Create a Layer Mask in Photoshop

Let’s be real Photoshop can feel like a whole other universe when you’re just starting out. I remember opening it for the first time, staring at all the tools, and thinking, “Where do I even begin?” But if there’s one tool that changed the way I edit—like, for real—it’s the layer mask.

If you’ve ever made an edit and wished you could undo just part of it, layer masks are your new best friend. They give you total control, without any of the pressure of making permanent changes.

What Is a Layer Mask?

Quick Answer: A layer mask lets you hide or reveal parts of a layer without deleting anything. Think of it like turning off a light instead of smashing the bulb.

Let me put it this way: imagine you’re coloring with a marker on a white sheet of paper. But instead of erasing your mistakes, you’re just covering them with invisible ink that you can remove later. That’s a layer mask in action.

Why Not Just Use the Eraser?

Short Answer: Because layer masks are non-destructive. You can undo changes anytime—no regrets, no mess.

I used to reach for the eraser tool all the time until I accidentally deleted part of a friend’s face in a group photo. Not a good look. That’s when I learned the magic of masking. It’s like Photoshop’s version of a safety net.

Setting Up: Before You Dive In

Quick Tip: Open your Layers panel (Window > Layers). It’s your Photoshop dashboard.

Before you jump in, make sure your workspace is tidy. I usually close all unnecessary panels and just keep Layers, Tools, and Properties open. It helps me stay focused—like clearing your desk before starting a project.

Step-by-Step: How to Create a Layer Mask

This part’s easy, promise. Once you try it, you’ll wonder how you ever edited without it.

Step 1: Open Your Image

Shortcut Tip: Drag and drop your photo into Photoshop. That’s it.

You don’t need to overthink this. Any image will do. I usually start with something simple—like a product photo or a landscape.

Step 2: Unlock the Layer

Shortcut Tip: Click the lock icon next to “Background” in the Layers panel.

Photoshop locks background layers by default. Just click it once to unlock, and boom—you’re ready to go.

Step 3: Add a Layer Mask

Shortcut Tip: Click the icon that looks like a square with a hole (bottom of the Layers panel).

Click it, and you’ll see a white box pop up next to your image layer. That’s your mask. It’s like Photoshop just handed you a magic wand.

Step 4: Select the Brush Tool

Shortcut Tip: Hit “B” on your keyboard.

Brush tool selected? Cool. Now we paint. But not like Bob Ross—we’re painting in black, white, or gray.

Step 5: Paint to Hide or Reveal

Black hides. White shows. Gray blends. Simple, right?

Here’s a metaphor: black is like blackout curtains, white is like an open window, and gray is like a sheer drape. That’s how the mask works.

I usually paint with black to hide parts I don’t want, then switch to white to bring them back if I change my mind. You can toggle between black and white with the “X” key.

Real Talk: Masking Changed My Workflow

When I started retouching portraits, layer masks gave me the power to smooth skin without blurring details, change backgrounds cleanly, and even blend two photos together like a pro. Once, I used a mask to remove a huge glare on a product photo, and the client thought I re-shot the whole thing. Nope—just a mask and some brushing magic.

How to Create a Layer Mask in Photoshop

Tips to Make Masking Even Easier

1. Use a Soft Brush

Quick Win: Set hardness to 0% for smooth, natural edges.

Harsh lines? Nope. You want your edits to blend, not shout. A soft brush does the trick every time.

2. Zoom In and Take Your Time

Shortcut: Cmd + (Mac) or Ctrl + (Win) to zoom.

I always zoom in when I’m working around tricky edges like hair or jewelry. It’s worth the extra few minutes.

3. Try Selections First

Pro Tip: Use the Quick Selection Tool, then click “Add Mask.”

Let Photoshop do the hard part. I use selections all the time—especially for complex shapes or background replacements.

Common Mistakes (I’ve Made Them All)

Mistake 1: Painting on the Image, Not the Mask

Fix It Fast: Click the white thumbnail (not the image!) before brushing.

I did this for months before realizing why nothing was happening. You live and learn.

Mistake 2: Forgetting the Black-White Logic

Reminder Rule: Black conceals, white reveals.

If your brush isn’t doing what you expect, check your colors. I keep this rule stuck to my monitor—just in case.

Try These Cool Masking Tricks

1. Gradient Masks

Want to fade one image into another? Use the Gradient Tool (G) on your mask. I love doing this for sky replacements or moody transitions between scenes.

2. Double Exposure with Masks

This one’s for the creatives. Use two images, add a mask to the top one, and blend parts of it to reveal the one underneath. Add a bit of color grading and—boom—you’ve got a double exposure straight out of a movie.

Final Thoughts: You Got This

Look, Photoshop can be overwhelming. But layer masks? They’re one of those tools that just make sense once you start using them. They’re flexible, forgiving, and freakin’ fantastic.

So don’t worry about being perfect. Play with it. Paint. Erase. Undo. Redo. That’s the beauty of masks—you’re always just a brushstroke away from fixing something.

And hey, if I could go from “What the heck is this white box?” to using layer masks daily in my freelance work, you absolutely can too.

FAQs

1. What’s the fastest way to add a layer mask?

Click the mask icon at the bottom of the Layers panel. Or press Alt (Option on Mac) + click for a black mask.

2. Can I delete a mask without affecting the layer?

Yes! Right-click the mask and choose “Delete Layer Mask.” Your original image stays untouched.

3. Can I use layer masks with adjustment layers?

Totally. Adjustment layers come with masks by default—so you can control where your edits apply.

4. Why is nothing happening when I paint?

Double-check you’re painting on the mask, not the image. And make sure you’re using black or white as your brush color.

5. Can I copy a mask from one layer to another?

Yes! Hold Alt (Option) and drag the mask to another layer. It copies everything—super useful for batch edits.

How to Make a Clipping Mask in InDesign

How to Make a Clipping Mask in InDesign

What’s a Clipping Mask, Anyway?

Imagine cutting a photo to fit inside a cookie cutter shape. That’s basically what a clipping mask does. In InDesign, it lets you hide parts of an image and only show what fits inside a shape like a circle, star, or even text.

A clipping mask is a shape that hides parts of an image outside its edges.

When I first tried this, I thought I needed Photoshop. Nope! InDesign can do it beautifully.

Why Would You Even Use a Clipping Mask?

Okay, real talk—sometimes a square image just doesn’t cut it. You might want to:

  • Fill text with a photo hello, trendy title pages.
  • Fit an image into a heart for a wedding invite.
  • Crop out distractions and focus on the good stuff.

Clipping masks help you make designs look polished, fun, and totally professional.

The first time I used one was for a birthday card. I wanted my niece’s photo in a balloon shape. It worked like a charm, and her smile said it all.

Let’s Set the Stage: Getting Ready in InDesign

Start Fresh with a New Document

Open up InDesign and start a new file (File > New > Document). Choose your size and margins. I usually go with an A4 or letter-sized page, but it’s totally up to you.

Create a new InDesign document and set your page layout before you begin.

Bring in Your Image or Graphic

Next, go to File > Place and pick your image. Click on the page to drop it in. Resize it if you need to.

Use File > Place to bring your image into the layout.

I usually drag corners while holding Shift so I don’t stretch it weirdly.

The Easiest Way to Create a Clipping Mask

This is the part where it gets fun.

Step 1: Draw Your Shape

Grab the shape tool (rectangle, ellipse, or polygon). Draw the shape where you want the image to appear. This is your mask.

Use the shape tool to draw your mask.

I love using circles for profile pics—it feels soft and modern.

Step 2: Drop Your Image Into the Shape

Select your image, then hit Ctrl+X (or Command+X on Mac) to cut it. Click the shape, then go to Edit > Paste Into (or use Ctrl+Alt+V).

Boom! The image snaps right into the shape.

Cut the image, then select the shape and choose Edit > Paste Into.

Using Text as a Clipping Mask (It’s Super Cool)

This one always makes people say, “Wait, how’d you do that?”

Turning Words Into Outlines

Type your word or phrase. Big bold fonts work best. Then select the text, go to Type > Create Outlines.

Turn text into outlines so it becomes a mask shape.

Heads up: once outlined, you can’t edit the text like normal. I usually make a backup just in case.

Pasting the Image Into the Text

Same trick here cut your image, click the outlined text, and use Edit > Paste Into.

Use Edit > Paste Into to put the image inside your outlined text.

It’s a total game-changer for posters, magazine headers, or even Instagram quotes.

Getting Fancy: Advanced Clipping Mask Tricks

Multiple Shapes? Use Compound Paths

Want to combine several shapes into one mask? Select them all, then go to Object > Paths > Make Compound Path.

Use compound paths to combine multiple shapes into one mask.

Perfect for overlapping circles or funky custom designs.

Clipping More Than One Thing? Group Them First

Let’s say you’ve got a bunch of little graphics you want to mask together. First, group them (Object > Group), then mask them as usual.

Group objects first, then mask.

Otherwise, InDesign gets confused and only clips one part.

Tips to Make Your Life Easier

  • Use the Direct Selection Tool (white arrow) to move the image inside the shape.
  • Right-click and go to Fitting > Fit Content Proportionally if things look squished.
  • Keep a copy of your original image on a separate layer—trust me, it’s a lifesaver.

Use fitting and direct selection tools to tweak your masked images easily.

Common Mistakes I’ve Totally Made and How to Avoid Them

  • Forgetting to outline text before pasting—yep, that doesn’t work.
  • Pasting into the wrong shape. Double-check what’s selected!
  • Using too small a shape and wondering where the image went. Been there.

Make sure to outline text, select the right shape, and use a large enough mask.

Final Thoughts

Learning how to make a clipping mask in InDesign felt like unlocking a cheat code. It opened up a whole new world of design possibilities for me. Whether you’re making a flyer, social media post, or something personal—clipping masks give your work that polished, creative edge.

Clipping masks in InDesign help you creatively crop images into any shape or text.

So go ahead, play around. You might just surprise yourself.

FAQs

Q1: Do I need Photoshop to make clipping masks?
Nope! InDesign does it all no Photoshop needed.

Q2: Can I undo the clipping mask?
Yes! Just select the masked object, right-click, and choose “Release Clipping Path.”

Q3: Can I move the image inside the mask?
Totally. Use the white arrow (Direct Selection Tool) to reposition the image.

Q4: Can I still edit the text after creating the mask?
Only if you didn’t convert it to outlines. Once it’s outlined, it’s like a shape—not text.

Q5: What’s the best type of image to use?
High-res images with some visual interest work best. Think textures, landscapes, or portraits.