,

Photo Masking Techniques: A Complete Beginner-Friendly Guide

Before we dive in, here’s something simple: Photo masking techniques help you isolate, refine, and reshape parts of an image without damaging the original photo. If you’ve ever wondered how professionals create flawless cutouts or smooth hair extractions, masking is the secret tool behind the magic.

I’ve spent years experimenting with image masking, from Photoshop to Filmora masking to online masking tools. Today, I’m sharing everything I’ve learned in the simplest way possible—just like talking to a friend over coffee.

Introduction to Photo Masking Techniques


Photo masking techniques let you edit specific parts of a picture without damaging the original image.

Masking is the digital version of placing a stencil over something—you show what you want and hide what you don’t. Whether you’re creating a picture mask, removing backgrounds, or editing only a face, masking editing gives you total control.

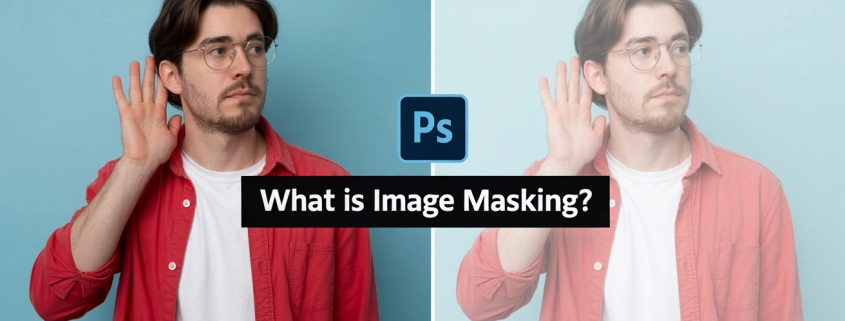
What Is Photo Masking?


Photo masking is a non-destructive editing method used to hide or reveal parts of an image.

If you’ve ever wished you could cut something out of a photo but still keep it “just in case,” masking is the superhero you need.

Masking photo editing works in tools like Photoshop, GIMP, Luminar, Affinity, and even online face mask photo editors. Instead of deleting pixels, you simply cover them—like using masking tape pictures to protect areas while painting.

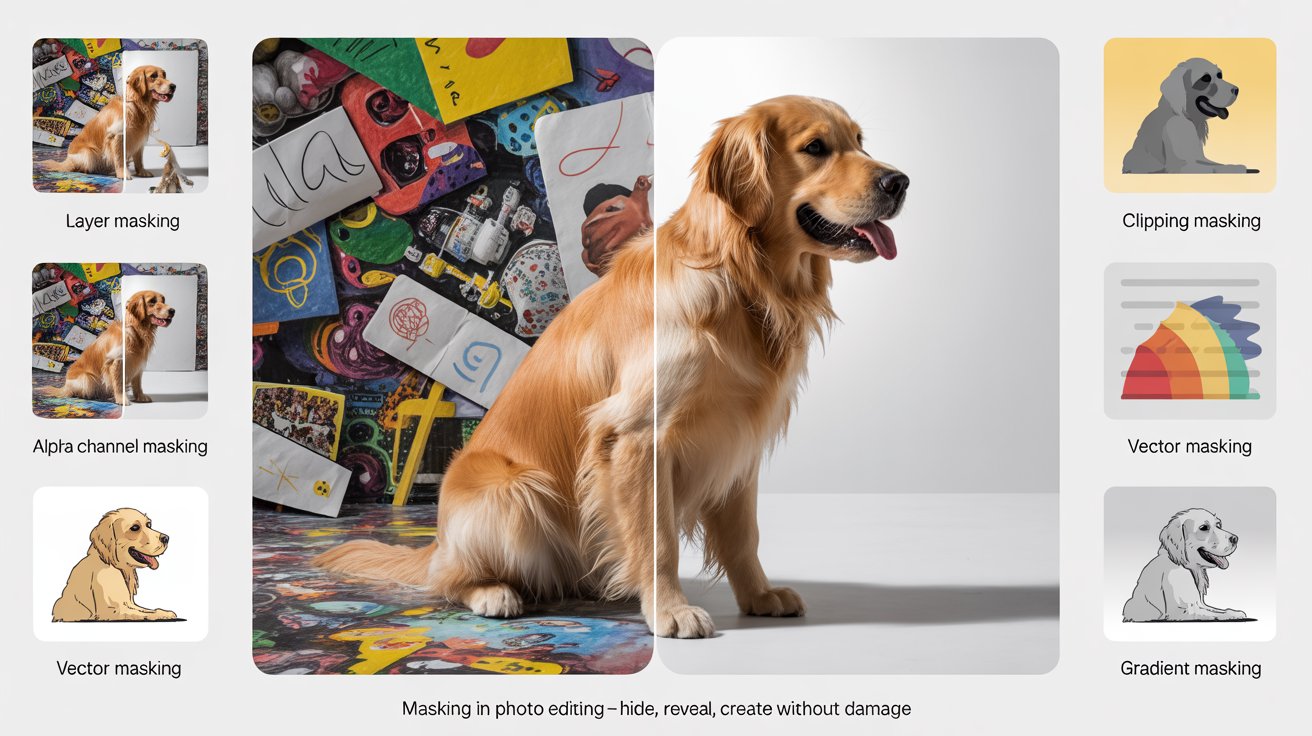
Types of Image Masking (Explained Simply)


Different masking types help you handle soft edges, sharp edges, and color-based selections.

Here are the main types:

a) Layer Masking

Perfect for general edits—hide/reveal parts of a layer.

b) Clipping Mask

Great for shaping images such as Canva mask image in shape styles.

c) Hair/Alpha Masking

Used for hair, fur, or tricky edges.

d) Color Masking

Targets specific colors—often used in Luminar AI masking.

e) Vector Masking

Clean, sharp edges for logos or objects.

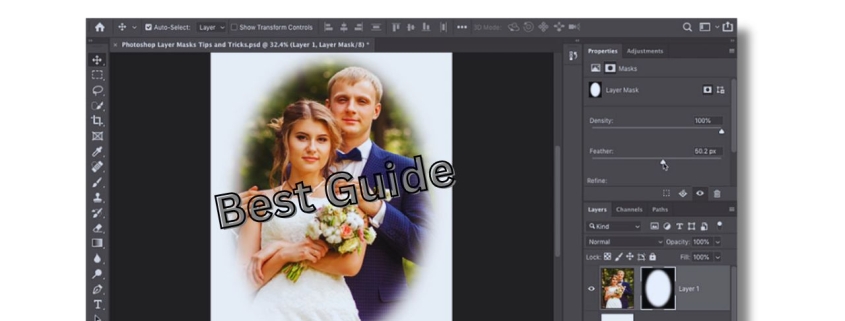
Layer Masking in Photoshop


Layer masks let you control transparency using black and white.

With layer masks, black hides, white reveals, and gray partially shows. You can:

  • Edit mask in Photoshop

  • Edit layer mask Photoshop

  • Photoshop edit vector mask

  • Mask photo black and white

  • Mask a photo in Photoshop

If you ever mess up, simply paint with the opposite color. It’s completely reversible.

Clipping Masks vs. Layer Masks


Layer masks hide parts of a layer; clipping masks use one layer to control another.

Think of clipping masks like cookie cutters. You can:

  • Shape photos

  • Insert images into text

  • Create marketing banners

Tools like image mask illustrator and affinity designer mask use clipping masks heavily.

Hair Masking for Complex Edges


Hair masking isolates soft edges such as hair, fur, or feathers.

If you ever tried removing a background around curly hair, you know the struggle. That’s where:

  • Hair masking photo

  • Hair masking picture

  • Masking hair in Photoshop

  • Vertus Fluid Mask 3

come in handy.

Professional editors like the team at Expert Clipping use advanced techniques to handle hair masking in minutes.

Alpha Channel Masking


Alpha masking is perfect when you’re working with color contrast.

It’s ideal for:

  • Product images

  • Jewelry

  • Transparent objects

  • Smoke or fabric

Tools like rawtherapee masks or image to mask rely on alpha channels.

Using Masking in Filmora, Lightroom & Other Editors


Filmora masking and Lightroom masking make it easy for beginners to control specific areas.

Popular tools include:

  • Masking in Filmora

  • Filmora 11 masking

  • Masking in Filmora 9

  • Lightroom edit mask

  • Masking in Lightroom mobile

  • Luminar masking

  • Affinity Photo masking iPad

You can create transitions, reveal text, or hide objects in your videos using video editor with masking tools.

Using Photo Masking Software & Online Tools


Online masking tools offer fast results without needing expert software.

Some examples:

  • Photo masks online

  • Image masking online

  • Mask image online free

  • Photo mask editor online

  • Face mask editor online

  • Online mask photo editor

They’re great for beginners who want instant results.

Masking for Product Photos


Masking helps create clean, professional product images for eCommerce.

Product photos often need:

  • Background removal

  • Shadow creation

  • Color correction

  • Transparent mask image

This is where companies like Expert Clipping shine, providing professional photo masking services at scale.

Masking in Video Editing


Video masking helps hide or reveal subjects in motion.

Tools like:

  • Masking video editing

  • Sony Vegas mask

  • Premiere Pro CS6 masking

  • PowerDirector masking

  • Corel VideoStudio masking

  • Videoleap masking

allow you to create cinematic transitions, reveal effects, and storytelling visuals.

Creative Uses of Masks (Fun Ideas)


Masks can turn ordinary images into creative masterpieces.

Try:

  • Funny mask photos

  • Mask on photo online

  • Black mask pictures

  • LED mask pictures

  • Beautiful mask images

Masking gives you endless creative opportunities.

Common Mistakes and How to Avoid Them


Most masking mistakes are caused by harsh edges or over-erasing.

Avoid these:

  • Hard brushes

  • Low-resolution images

  • Rushing hair masking

  • Forgetting to refine the mask

  • Using delete instead of masking

Why Expert Clipping Can Help You


Expert Clipping provides professional masking services when your project needs accuracy.

Whether you need:

Expert Clipping delivers high-quality results quickly and affordably.

Conclusion


Photo masking techniques give you full control over editing without damaging the original image.

Masking is one of those skills that looks complicated but becomes incredibly satisfying once you get the hang of it. Whether you’re using Photoshop, Filmora, Lightroom, or online tools, mastering masking will change the way you edit forever.

And if you ever feel stuck? Professional services like Expert Clipping can handle the tough parts for you.

FAQs

1. What is the easiest photo masking technique for beginners?

Layer masking is the easiest because it only requires using a brush to hide or reveal parts of an image.

2. Can I use masking without Photoshop?

Yes! Tools like GIMP, Lightroom, Filmora, Luminar, and online masking tools work great.

3. What is hair masking in photo editing?

Hair masking helps isolate fine hair strands using soft-edge masking and alpha channel techniques.

4. Is photo masking the same as background removal?

Not exactly background removal is one use of masking, but masking can do much more.

5. Why do professionals prefer masking instead of erasing?

Masking is non-destructive, meaning you can always fix mistakes or adjust edits later.

,

Layer Mask: The Simple Trick That Changes Everything in Photo Editing

Layer Mask

When I first learned what a layer mask was, it felt like someone finally handed me the missing piece of a puzzle. If you’ve ever wondered how editors create smooth blends, remove backgrounds cleanly, or make stunning composite images, the secret is often the same layer masks. Whether you’re an e-commerce store owner, a designer, or a curious beginner, understanding layer masks will change how you edit photos forever.

A layer mask lets you hide or reveal parts of a layer without deleting anything, giving you complete control over your edits.

Introduction to Layer Masks

A layer mask is a tool that shows or hides parts of a layer without deleting anything.

When I first discovered layer masks, it felt like magic. I could remove a background and later without stress bring it back if needed. For photographers and e-commerce sellers, this kind of flexibility isn’t just helpful; it’s essential.

Why Layer Masks Matter

Layer masks keep your edits safe, clean, and fully reversible.

Whether you shoot product photos for Amazon or design banners for clients, you need edits that don’t destroy the original image. Layer masks are like editing insurance they protect everything underneath so you can work freely.

Understanding How Layer Masks Work

Black hides, white reveals, and gray partially reveals.

Think of a layer mask like a window curtain. Pull it back (white), and you see the view. Close it (black), and the view disappears. Open it halfway (gray), and you get a soft, faded look. That’s the layer mask in action.

Layer Mask vs. Eraser – What’s the Difference?

A layer mask is reversible; the eraser is permanent.

Using the Eraser is like cutting a piece out of paper you can’t get it back. Using a layer mask is more like covering an area with removable tape. You can always restore or adjust it later.

How to Make a Layer Mask in Photoshop

Select your layer, click the mask icon, and paint with black or white.

Here’s a simple step-by-step:

  1. Open your image in Photoshop.

  2. Select the layer you want to mask.

  3. Click the Layer Mask icon at the bottom of the Layers panel.

  4. Choose the Brush Tool.

  5. Paint with black to hide, white to reveal.

This method is the core of how to make a layer mask and works for everything from portraits to product photos.

Types of Layer Masks You Should Know

Photoshop offers pixel masks, vector masks, and clipping masks.

  • Pixel Mask: Soft, brush-based edits.

  • Vector Mask: Sharp edges using shapes or paths.

  • Clipping Mask: Uses one layer to control the visibility of another.

Each serves a purpose, and as you grow your skills, you’ll likely use all three.

Layer Mask Images for E-commerce

Short Answer: Layer masks help create clean product photos that convert better.

Online shoppers judge products by their images instantly. Layer masks let you:

  • Remove backgrounds

  • Create reflection shadows

  • Highlight product details

  • Make images uniform for marketplaces like Amazon and Etsy

This is one reason many sellers rely on services like Expert Clipping, which uses advanced layer mask techniques to enhance product photos professionally.

Using Layer Masks for Real Estate Photos

Layer masks help blend exposures and enhance property photos.

Real estate marketers often merge multiple exposures bright windows, detailed interiors, clean skies. Layer masks allow you to combine the best parts of each shot with perfect transitions.

Layer Masks for Fashion and Apparel Brands

Layer masks give fashion photos flawless cutouts and retouching.

Whether it’s a model shoot or clothing flat lay, masks help:

  • Remove stray fabric edges

  • Retouch skin smoothly

  • Blend shadows naturally

  • Swap backgrounds without harsh lines

Fashion brands depend heavily on this technique for catalog-ready images.

Creative Agencies & Designers: Why You Need Layer Masks

Layer masks help create clean, layered artwork.

Designers often mix text, shapes, gradients, and photos. A layer mask lets you control each element precisely like sculpting light and shadows without touching the original artwork.

Common Layer Mask Mistakes and Fixes

Avoid hard brushes, painting on the layer, and forgetting to select the mask.

Mistakes include:

  • Painting on the actual image instead of the mask

  • Using a brush that’s too hard

  • Forgetting to reset colors to black and white

  • Not unlinking the mask when moving parts

Fixing these habits instantly improves your results.

Advanced Layer Mask Techniques

You can create gradients, blend textures, and control multiple layers using masks.

Once you’re comfortable, try:

  • Gradient Masks for smooth transitions

  • Luminosity Masks for brightness-based selections

  • Mask Groups to organize complex projects

  • Mask Refinements like feathering and density adjustments

These techniques are the backbone of professional editing.

How Expert Clipping Uses Layer Masks Professionally

Expert Clipping uses layer masks to deliver clean, non-destructive edits for clients.

Their team offers services such as:

  • Background removal

  • Photo retouching

  • Product clipping

  • E-commerce image enhancement

  • Color correction

Layer masks help them produce perfect, reversible results for clients who demand precision.

Why Non-Destructive Editing Matters

Non-destructive editing keeps your original safe and makes revisions easy.

Imagine sending product photos to Amazon, and they ask for changes. With layer masks, fixing mistakes or adjusting styles is painless. Without masks, you’d be forced to restart from scratch.

Final Tips to Master Layer Masks

Practice with black and white brushes and stay patient.

Quick tips:

  • Use a soft brush for smooth edges

  • Zoom in for precision

  • Toggle the mask on/off to compare changes

  • Feather edges when needed

  • Remember: Black hides, white reveals

Conclusion

Layer masks give you full control without losing original image data.

Once you start using layer masks, you’ll never go back. They’re powerful, simple, and essential—whether you’re an e-commerce seller, photographer, designer, or hobbyist. And if you want flawless results, professional services like Expert Clipping can take your images to the next level.

FAQs

1. What is a layer mask in simple terms?

A layer mask lets you hide or reveal parts of a layer without deleting anything.

2. How do I create a layer mask in Photoshop?

Just select a layer and click the mask icon, then paint with black or white.

3. Why should I use a layer mask instead of the Eraser?

Because a mask is reversible—your original photo stays safe.

4. Can beginners learn layer masks easily?

Yes! They’re one of the easiest and most powerful Photoshop features.

5. Are layer masks useful for e-commerce sellers?

Absolutely. They help create clean, professional product photos that boost sales.

,

What Is Masking in Photo Editing

What Is Masking in Photo Editing

Introduction to Masking

The Concept of Masking

Alright, imagine you’re trying to color a picture but want to keep certain parts safe—like covering them with a sticky note. That’s kind of what masking does in photo editing.

Masking in photo editing lets you hide or reveal specific parts of an image without deleting anything. It’s like having a magic eraser that you can undo anytime.

I remember the first time I stumbled across masking in Photoshop. I was trying to make my dog stand out from a messy background. Cutting him out perfectly with the eraser tool? Total disaster. Masking saved the day—and my nerves.

Why Masking Matters

You know how frustrating it is to ruin an image with one wrong edit? Masking prevents that.

It’s a non-destructive way to make precise changes, whether you’re brightening just one area or removing a background. Plus, you can always tweak it later.

Masking gives you control. Like driving a car with power steering versus wrestling an old wagon.

Types of Masking Techniques

Layer Masking

Layer masking is your bread and butter.

It allows you to hide or show parts of a layer by painting with black, white, or gray. Black hides, white reveals, and gray makes things semi-transparent.

When I first used layer masks, I felt like a magician. I could “erase” part of a layer without losing it. It’s perfect for smoothing out skin or adjusting sky brightness—without touching the whole image.

Clipping Masks

Here’s a fun one: clipping masks.

A clipping mask lets one layer “clip” into the shape of the layer below. It’s like pouring paint into a stencil.

I use this a lot when designing social media posts. Want your photo to only show through the shape of some text? Clipping mask it!

Alpha Channel Masking

Sounds fancy, right? But it’s super handy.

Alpha channel masks are great for selecting complex areas—like hair or fur—using grayscale info. The lighter the area, the more visible it is.

This saved me when editing a photo of my friend’s dog mid-jump. That flying fur? Alpha masking handled it better than anything else.

Vector Masking

This one’s for the clean freaks.

Vector masks use shapes and paths instead of pixels, which makes them razor-sharp and scalable.

It’s perfect for logos or anything you might resize later. I used this for a client’s brand once and it looked crisp whether on a website or a billboard.

Gradient Masking

Want a smooth transition from one image to another?

Gradient masking blends areas using a gradual fade from black to white. It’s how you make dreamy double exposures or subtle vignettes.

I once blended a sunset into a portrait using this. It looked like she was glowing—without needing any extra effects.

What Is Masking in Photo Editing

Practical Applications of Masking

Selective Adjustments

Need to fix just the shadows under someone’s eyes?

Masking lets you apply edits to only part of the image without affecting the whole thing.

It’s like saying, “Hey, brighten this area, but leave everything else alone.” Super useful for portraits or tricky lighting.

Background Removal

I won’t lie—this is my favorite use.

Masking is ideal for removing backgrounds, especially with fine details like hair or smoke.

It feels like peeling off a sticker to reveal a clean surface underneath. You can swap out dull skies or remove messy rooms in seconds.

Composite Image Creation

Ever seen a photo of someone standing on the moon? Probably a composite.

Masking lets you combine different images into one seamless scene.

Once, I created a fantasy landscape by blending a forest, a galaxy sky, and a silhouette. All with masks.

Edge Refinement

Sometimes your selection just isn’t perfect. Edges look choppy or fake.

Masking helps smooth and refine those edges, making everything look more natural.

A quick feather or brush tweak can turn a hard cut-out into a flawless blend.

Tools and Software for Masking

Adobe Photoshop

Photoshop is the king here.

It offers every kind of mask you can dream of—layer, vector, gradient, clipping, and alpha channel.

If you’re serious about editing, learning masking in Photoshop is like learning to drive with a stick shift. Worth it.

Lightroom

Lightroom’s simpler but still powerful.

You can mask with tools like the brush, radial filter, or gradient tool to adjust specific areas of a photo.

It’s great for photographers who want speed and efficiency.

Affinity Photo

This one’s a hidden gem.

Affinity Photo gives you pro-level masking tools with a one-time price.

I used it on a budget once, and honestly? It did everything I needed for masking and then some.

Luminar Neo

Want AI to do the hard work?

Luminar Neo has smart masking tools that use artificial intelligence to auto-select skies, people, and objects.

Sometimes I feel like I’m cheating—but hey, if it works, it works!

Advanced Masking Techniques

Intersecting Masks

Ever want to mix two masks? You can!

Intersecting masks combine areas from multiple masks for precise control.

It’s like using both a magnifying glass and tweezers. Super specific edits, made simple.

Using AI for Masking

Tech is catching up fast.

AI-powered masking tools can detect and isolate subjects, backgrounds, or skies automatically.

I used an AI mask on a group photo, and it picked out each person perfectly. No manual selecting needed. Total time-saver.

Common Mistakes and How to Avoid Them

Over-Masking

Less is more.

If you mask too aggressively, your edits might look fake or flat. Always zoom out and check your work.

Been there once masked a model’s hair so much, she looked like she was wearing a helmet!

Ignoring Feathering

Feathering is your best friend.

It softens the edge of your mask to make transitions smooth.

Without it, you get those weird harsh lines. Like when you cut paper with dull scissors.

Conclusion

Masking in photo editing is like having a magic brush that lets you fix, blend, hide, or reveal—without ever damaging the original picture.

It gives you the power to make subtle adjustments or dramatic changes, all while keeping control. Whether you’re removing backgrounds, fixing lighting, or creating artistic edits, masking is the secret sauce behind great images.

Once you get the hang of it, you’ll wonder how you ever edited without it.

FAQs

Q1: What’s the easiest masking method for beginners?
Layer masking. It’s simple, forgiving, and super flexible.

Q2: Is masking available in free photo editors?
Yes! Tools like GIMP and Photopea offer masking features too.

Q3: Can I use masking on mobile apps?
Absolutely. Apps like Snapseed and Lightroom Mobile support basic masking.

Q4: Does masking affect the original image?
Nope. It’s non-destructive, meaning you can undo or adjust it anytime.

Q5: How can I practice masking?
Start with portraits. Try lightening faces or changing backgrounds to get a feel for it.