Best Camera Setting for Product Photography: Complete Guide for Sharper, Cleaner, Sell-Worthy Shots
Have you ever clicked what you thought was the perfect product shot—only to find it’s blurry, poorly lit, or just off in color? You’re not alone. Getting your product images right isn’t about having the most expensive camera; it’s about understanding how to use the one you’ve got.
Whether you’re an eCommerce brand owner, a DIY product photographer, or just trying to level up your image game this guide breaks down the best camera setting for product photography in simple, friendly language.
We’ll cover ISO, aperture, shutter speed, white balance, and more. I’ll even share my favorite go-to settings from real studio shoots with Expert Clipping clients. And yes we’ll tackle those annoying blurry shots and confusing file formats too.
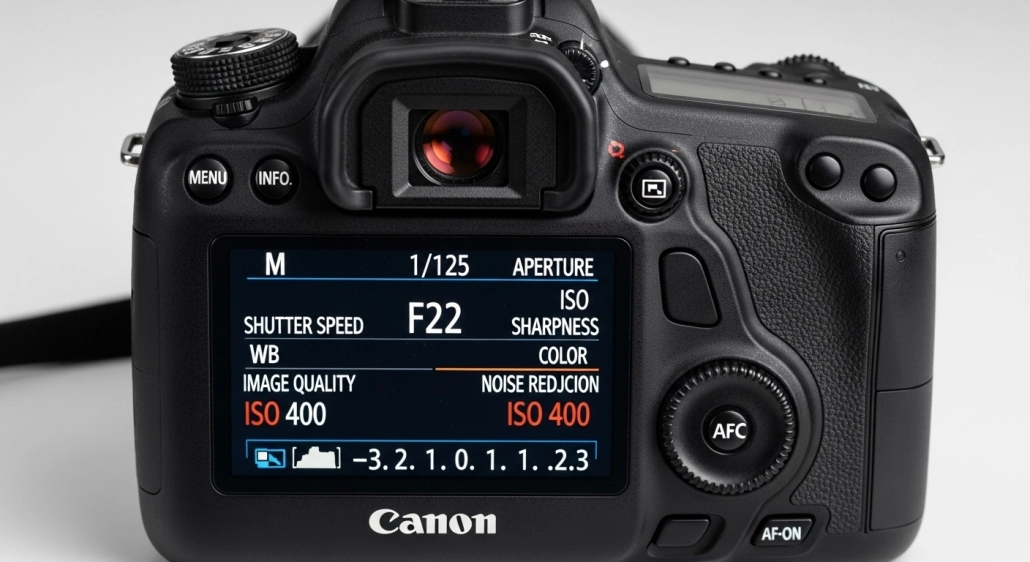
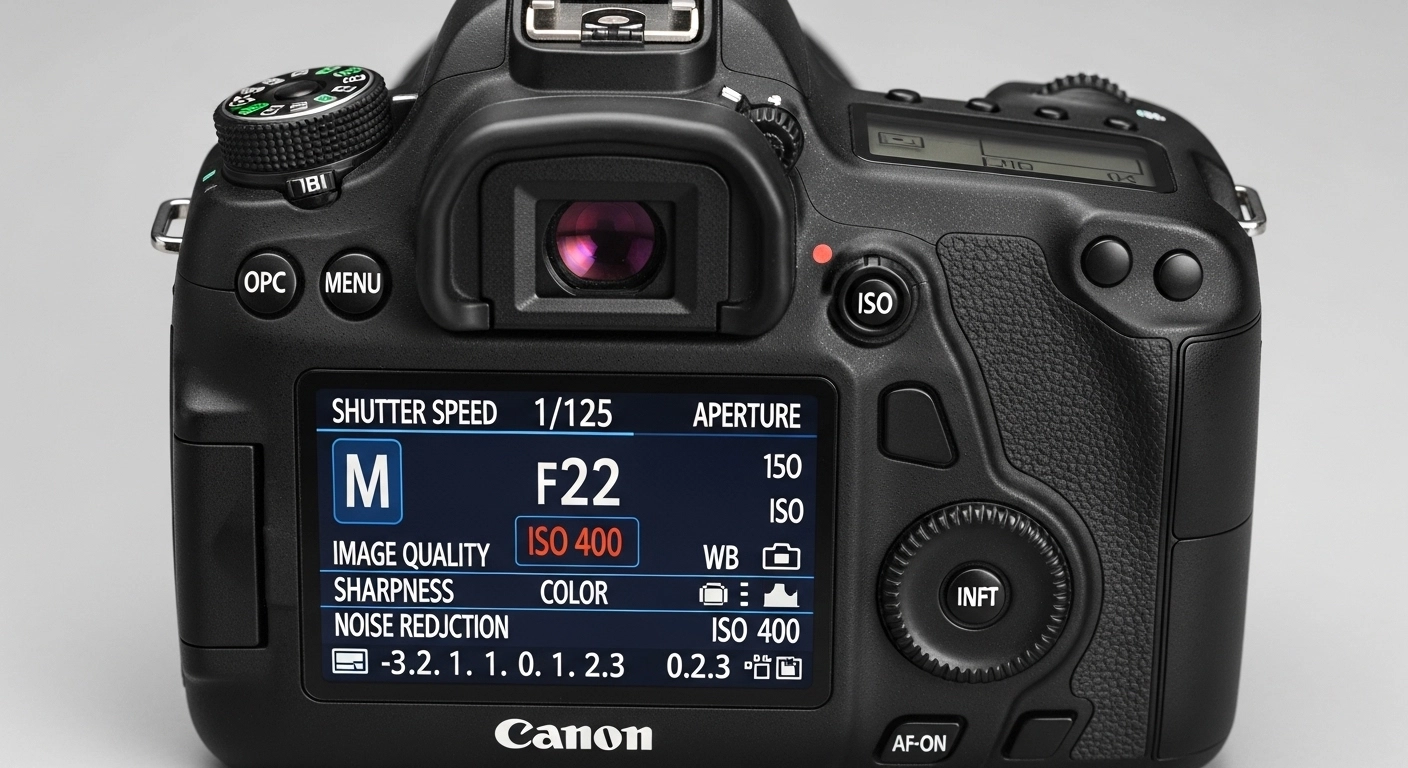
The best product photography camera settings usually include ISO 100, aperture f/8 to f/11, and shutter speed of 1/125 or faster with consistent white balance and RAW format.
Contents
- 1 Why Camera Settings Matter
- 2 What Are the Best Manual Camera Settings?
- 3 Understanding ISO: Keep It Low, Keep It Clean
- 4 Aperture (f-stop): Your Product’s Depth of Field Game
- 5 Shutter Speed: Freeze That Frame
- 6 White Balance: Get the Colors Just Right
- 7 RAW vs JPEG: Which Format Should You Use?
- 8 Manual vs Auto Mode: Which One Wins for Product Photography?
- 9 Exposure Triangle: How to Balance ISO, Aperture & Shutter
- 10 When to Use a Tripod (Hint: Almost Always)
- 11 How to Focus Right: Sharpness That Sells
- 12 Best Settings by Lighting Type
- 13 Sample Camera Settings by Product Type
- 14 Real Customer Reviews: What the Pros Are Saying
- 15 Expert Clipping Tips + Freebies
- 16 🎓 Conclusion: Dial in the Settings, Watch Your Sales Rise
- 17 ❓ Frequently Asked Questions
Why Camera Settings Matter
Your product photos are your silent salespeople.
Think of it this way: no one buys a pizza from a blurry menu pic. It’s the same with your product. Sharp, bright, color-accurate photos help customers trust your brand and click “Add to Cart.”
So let’s learn the best manual settings not just to take better photos, but to take consistent, conversion-boosting photos.
What Are the Best Manual Camera Settings?
| Setting | Ideal Value | Why It Works |
| ISO | 100–200 | Clean, noise-free image |
| Aperture | f/8 – f/11 | Sharp focus across product |
| Shutter Speed | 1/125 – 1/250 sec | Prevents motion blur |
| White Balance | Manual or Custom | Accurate color reproduction |
| File Format | RAW | More control in editing |
✅ Short Answer: Use ISO 100, aperture f/8, shutter speed 1/125, manual white balance, and shoot in RAW for best results.
Understanding ISO: Keep It Low, Keep It Clean
ISO controls your camera’s sensitivity to light. High ISO = brighter photo, but it also brings grain or noise. For product photography? That’s a big no-no.
Stick with ISO 100 (or 200 if needed) to keep things crisp and clean.
📌 Pro Tip: If your image looks too dark at ISO 100, add more light not ISO.
Aperture (f-stop): Your Product’s Depth of Field Game
Aperture controls how much of your image is in focus.
- Use f/8 to f/11 for a deep depth of field. Your entire product will be sharp.
- Avoid f/1.8 or f/2.8 unless you want just part of the product in focus.
🎯 Quick Win: For sharpness from front to back, stick to f/8–f/11.
Shutter Speed: Freeze That Frame
Shutter speed decides how long your camera sensor is exposed to light. If it’s too slow, even the tiniest movement will blur your photo.
- Use 1/125 sec or faster.
- On a tripod, slower shutter speeds are fine but beware of camera shake if handheld.
⏱ Snapshot Tip: Faster shutter = sharper shots, especially for shiny or reflective items.
White Balance: Get the Colors Just Right
White balance tells your camera what “white” should look like. It affects all colors in your shot.
- Manual or Custom White Balance is best.
- Don’t trust Auto WB—it can shift your tones under different lighting.
🎨 Color Accuracy Tip: Set custom white balance using a gray card for eCommerce consistency.
RAW vs JPEG: Which Format Should You Use?
| File Format | Pros | Cons |
| RAW | Maximum editing control, high quality | Larger file size |
| JPEG | Small file size, fast upload | Limited editing, loss of quality |
🛍 Ecommerce Essential: Always shoot RAW for flexibility—then export JPEGs for your listings.
Manual vs Auto Mode: Which One Wins for Product Photography?
Manual mode gives you full control over ISO, shutter speed, and aperture.
Auto mode might guess wrong—especially with white backgrounds or shiny items. One click, and your exposure is toast.
🧠 Clarity Tip: Manual mode ensures every image looks the same across your catalog.
Exposure Triangle: How to Balance ISO, Aperture & Shutter
Think of ISO, aperture, and shutter speed like the legs of a three-legged stool. Change one, and you must adjust the others to keep your photo balanced.
💡 Balance Rule:
- Low ISO = less light (compensate with wider aperture or slower shutter).
- Narrow aperture = less light (compensate with higher ISO or slower shutter).
- Fast shutter = less light (compensate with more light or higher ISO).
When to Use a Tripod (Hint: Almost Always)
A tripod keeps your camera stable—period.
- Use it for sharpness
- Use it for consistency
- Use it when shooting in low light
📸 Sharp Tip: Even if your camera has stabilization, a tripod eliminates shake and frames every product identically.
How to Focus Right: Sharpness That Sells
Use manual focus or single-point autofocus on the key feature of your product.
Focus on:
- The label for bottles
- The gem for jewelry
- The stitching for clothes
🔍 Focus Hack: Use your camera’s Live View and zoom in to confirm sharpness before clicking.
Best Settings by Lighting Type
| Lighting Type | ISO | Aperture | Shutter Speed |
| Natural Light (window) | 100–200 | f/8–f/11 | 1/125 or slower |
| LED Continuous Light | 100 | f/8 | 1/125–1/200 |
| Flash | 100 | f/11 | 1/200 or camera sync speed |
💡 Pro Move: Match your settings to your lighting to prevent shadows or glare.
Sample Camera Settings by Product Type
| Product Type | Suggested Settings |
| Jewelry | ISO 100, f/11, 1/200 sec |
| Clothing | ISO 100, f/8, 1/125 sec |
| Electronics | ISO 100, f/9, 1/160 sec |
| Beauty Products | ISO 100, f/10, 1/200 sec |
Need better jewelry photos? Try our jewelry retouching services for flawless sparkle.
Real Customer Reviews: What the Pros Are Saying
⭐️⭐️⭐️⭐️⭐️ “I followed this guide and my Amazon listings look 10x better! Expert Clipping helped clean up the background, too.” – Jenna T., Handmade Skincare Owner
⭐️⭐️⭐️⭐️⭐️ “I used to guess camera settings. Now I use f/8 and ISO 100 every time. Consistent photos = more sales.” – Ravi K., Shopify Store Owner
⭐️⭐️⭐️⭐️⭐️ “Expert Clipping not only fixed my photos but taught me what settings to use. Huge time saver!” – Thomas B., Product Photographer
Expert Clipping Tips & Freebies
We’ve edited thousands of eCommerce images. Here’s what we offer:
✅ First 3 Images Free
🧮 Free Pricing Calculator
📦 Bulk Discounts for Sellers
Need more help? We offer:
Expert Clipping Tips + Freebies
At Expert Clipping, we’ve worked on thousands of eCommerce images. We know what pops and what flops.
💡 Freebies for You:
- ✅ Request Your First 3 Images Free → Test our background removal or retouching.
- 🧮 Get Instant Cost Estimate → Use our pricing calculator for bulk edits.
- 🔄 Subscribe & Save on Bulk Editing → Ideal for sellers with 100s of SKUs.
Need pro editing? 📸 We help photographers, Amazon sellers, and fashion brands turn “meh” into “wow.”
🎓 Conclusion: Dial in the Settings, Watch Your Sales Rise
Getting the best camera setting for product photography isn’t about guessing—it’s about understanding your tools.
Start with ISO 100, f/8 aperture, and 1/125 shutter speed. Set white balance manually. Shoot in RAW. Mount that camera on a tripod. Boom—you’re now in control.
Want the cherry on top? Send your shots to Expert Clipping for polish, perfection, and pure profit potential.
❓ Frequently Asked Questions
- What’s the best ISO for product photography?
ISO 100 is ideal for clean, sharp images. Use ISO 200 only if your lighting is limited. - Should I always shoot in RAW format?
Yes. RAW gives you more flexibility for color correction, shadows, and highlights in post-editing. - Can I shoot product photos without a tripod?
Technically yes, but for consistent, sharp, and repeatable results, a tripod is highly recommended. - Is f/8 always the best aperture?
It’s a great starting point. f/8–f/11 offers sharpness and depth. For jewelry or macro shots, f/11–f/16 may be better. - What happens if I use Auto White Balance?
You risk inconsistent colors—especially under different lights. Set custom WB for accuracy.


Leave a Reply
Want to join the discussion?Feel free to contribute!