How to Shoot Ghost Mannequin | The Complete Beginner-to-Pro Guide
Contents
- 1 Why Ghost Mannequin Photography is the Secret Sauce for Apparel Brands
- 2 What is Ghost Mannequin Photography?
- 3 What Does the Ghost Mannequin Effect Look Like?
- 4 Why Use Ghost Mannequin Photography?
- 5 Equipment Needed for Ghost Mannequin Photography at Home
- 6 How to Shoot Ghost Mannequin Photos: Step-by-Step
- 7 Editing Ghost Mannequin Photos in Photoshop
- 8 Best Apps for Ghost Mannequin Editing
- 9 Ghost Mannequin vs Flat Lay Photography
- 10 Common Mistakes in DIY Ghost Mannequin Edits
- 11 When to Use Ghost Mannequin Photos vs Live Models
- 12 Should You Outsource Ghost Mannequin Editing?
- 13 Where to Get Ghost Mannequin Services: Expert Clipping
- 14 Pricing Table: DIY vs Professional Service
- 15 Real Customer Reviews of Expert Clipping
- 16 Conclusion & Key Takeaways
- 17 FAQs
Why Ghost Mannequin Photography is the Secret Sauce for Apparel Brands
Ever seen those crisp, floating fashion product images where clothes seem to wear themselves? That’s the magic of ghost mannequin services. It gives clothing a 3D shape without showing any models or mannequins. If you’re selling apparel online, this trick is like adding seasoning to bland food—it turns a basic image into something mouthwatering and clickable.
Whether you’re a solo seller or a big brand, ghost mannequin images add a pro-level look that builds trust and boosts sales. In this guide, I’ll walk you through tools, editing, and even where to get affordable help from a professional ghost mannequin service provider.
What is Ghost Mannequin Photography?
Ghost mannequin photography also called invisible mannequin—is a method used to photograph clothing so that the mannequin disappears in post-editing. This makes it look like the garment is floating, giving it depth and shape.
Short answer: It’s a photo editing technique where the mannequin is removed digitally, creating a 3D floating look for fashion products.
Think of it like removing training wheels from a bike you still get support during the shoot, but the final product looks polished and independent.
What Does the Ghost Mannequin Effect Look Like?
The final image has no model or mannequin, just the clothing shaped perfectly, like an invisible person is wearing it. You’ll often see this on Zara or ASOS.
Short answer: It gives clothes a full-bodied shape without showing the mannequin or model.
📸 Pro Tip: Show the front, back, and inner neck area for a premium look.
Why Use Ghost Mannequin Photography?
Here’s why top fashion stores use this technique:
- Clean, professional look
- Focus stays on the clothing
- Increases customer trust
- Higher conversion rates
Short answer: It enhances the product’s appeal and builds brand credibility.
According to Shopify, ghost mannequin images convert 20–30% better than flat lay photos!
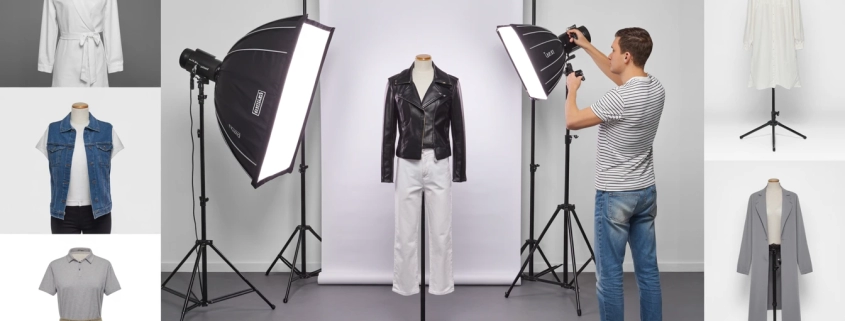
Equipment Needed for Ghost Mannequin Photography at Home
You don’t need a fancy studio. Here’s your starter kit:
- DSLR or smartphone with good resolution
- Tripod (for consistent angles)
- Plain white background
- Ghost mannequin (removable chest/neck)
- Softbox lighting or natural light
Checklist Table:
| Item | Essential? | Affordable Alternatives |
| DSLR Camera | ✅ | Smartphone with 12MP+ |
| Tripod | ✅ | Stack of books (temporary) |
| White Background | ✅ | White bedsheet or wall |
| Ghost Mannequin | ✅ | Foam board or hanger hacks |
| Lighting | ✅ | Use window light near noon |
How to Shoot Ghost Mannequin Photos: Step-by-Step
Step 1: Dress the mannequin neatly. Use clips or pins to tighten the fabric.
Step 2: Photograph the front view. Then shoot the back and inner label area.
Step 3: Maintain consistent angles and lighting.
Step 4: Edit out the mannequin or use clipping path services to remove it.
Short answer: Take multiple shots of the garment front, back, and inside—and combine them digitally.
📦 Tip: Don’t forget to iron the clothes! Wrinkles kill the look.
Editing Ghost Mannequin Photos in Photoshop
If you’re handy with Photoshop, here’s what to do:
- Use the Pen Tool to cut out the mannequin
- Layer front and back shots
- Blend shadows for realism
- Save in high resolution
Short answer: Use selection and layer masks to remove the mannequin and reveal inner garment shots.
Or skip the hassle and let photo retouching services handle it fast.
👉 Get your first 3 images free!
Best Apps for Ghost Mannequin Editing
If Photoshop isn’t your thing, try:
- Photoroom (Beginner-friendly)
- Canva Pro (basic background removal)
- Remove.bg (one-click mannequin eraser)
Short answer: Use Photoroom for quick mobile edits; Photoshop for professional control.
Ghost Mannequin vs Flat Lay Photography
| Feature | Ghost Mannequin | Flat Lay |
| 3D Shape | ✅ Yes | ❌ No |
| Realism | ✅ High | ⚠️ Moderate |
| Editing Required | ✅ More | ✅ Less |
| Conversion Rate | ✅ High | ⚠️ Low to Medium |
Short answer: Ghost mannequin looks more professional and realistic than flat lay.
Common Mistakes in DIY Ghost Mannequin Edits
- Skipping the inner neck shot
- Inconsistent lighting
- Crooked camera angles
- Poor background removal
Short answer: Missing key angles or poor editing can ruin the effect.
⚠️ Always shoot extra photos just in case.
When to Use Ghost Mannequin Photos vs Live Models
Use ghost mannequins when:
- You want consistency
- You’re on a tight budget
- You sell many SKUs
Use live models when:
- Selling lifestyle fashion
- Emphasizing emotion/fit
Short answer: Ghost mannequin works best for product listings; models for brand stories.
Should You Outsource Ghost Mannequin Editing?
If you lack time or Photoshop skills, definitely consider outsourcing.
Short answer: Outsourcing saves time, ensures quality, and boosts professionalism.
✅ Need help? Try professional ghost mannequin services or photo retouching services.
Also, explore related product photo retouching for a complete look.
Where to Get Ghost Mannequin Services: Expert Clipping
We at Expert Clipping specialize in:
- Ghost mannequin editing
- 24-hour delivery
- Bulk discounts
- Free trials
Short answer: Expert Clipping offers affordable, high-quality ghost mannequin service.
💬 “Request Your First 3 Images Free” and test our quality today.
Pricing Table: DIY vs Professional Service
| Feature | DIY | Expert Clipping |
| Time | 1–2 hrs per image | 24-hr delivery |
| Cost | Free (but time-consuming) | Starting $1.99/image |
| Skill Needed | High | None |
| Revisions | Manual | Free revisions |
🧮 Get Instant Cost Estimate for your bulk image project.
Real Customer Reviews of Expert Clipping
⭐️⭐️⭐️⭐️⭐️ “Expert Clipping made my store look 10x more professional. Super fast and affordable!” — Lena, Dropshipper
⭐️⭐️⭐️⭐️⭐️ “Tried DIY for weeks, then used Expert Clipping. Never going back.” — Raj, Boutique Owner
⭐️⭐️⭐️⭐️⭐️ “They nailed the ghost mannequin look! Highly recommend for fashion brands.” — Steph, Apparel Designer
Conclusion & Key Takeaways
Ghost mannequin photography is more than just a trend—it’s a proven strategy for standing out in fashion ecommerce. Whether you’re shooting with a phone or DSLR, the results can look stunning with the right technique—or with help from pros like Expert Clipping.
✅ Use consistent lighting
✅ Always shoot interior garment shots
✅ Outsource if you want speed + perfection
Request Your First 3 Images Free and see the magic for yourself.
FAQs
- What’s the easiest way to remove a mannequin from a clothing photo?
Use apps like Photoroom or hire a service like Expert Clipping for fast results. - Can I do ghost mannequin photography using just a smartphone?
Absolutely! Use good lighting and follow basic composition rules. - Should I photograph both front and back views?
Yes, and don’t forget the inner neckline to complete the ghost effect. - Are ghost mannequin images better than flat lay shots?
Yes. They create a 3D look and convert more customers. - How can I make ghost mannequin edits faster?
Use batch editing tools—or outsource to Expert Clipping for speed and precision.
Ready to elevate your product photos? 👉 Get Instant Cost Estimate or Request Your First 3 Images Free with Expert Clipping.


Leave a Reply
Want to join the discussion?Feel free to contribute!