Best Camera Setting for Product Photography: Complete Guide
Contents
- 1 Best Camera Setting for Product Photography: Complete Guide for Sharper, Cleaner, Sell-Worthy Shots
- 1.1 Why Camera Settings Matter
- 1.2 How To Set Your Camera’s ISO, Aperture, and Shutter Speed for DIY Product Photography
- 1.2.1 The Exposure Triangle: ISO, Aperture & Shutter Speed
- 1.2.2 What Is ISO and Why It Matters in Product Photography
- 1.2.3 Best ISO Settings for Sharp Product Shots
- 1.2.4 What Does Aperture Do in Product Photography?
- 1.2.5 Ideal Aperture Settings (With Depth-of-Field Tips)
- 1.2.6 How Shutter Speed Affects Product Image Sharpness
- 1.2.7 Shutter Speed: slow and steady (on a tripod)
- 1.3 More Manual Camera Settings
- 1.4 How to Set Up Your Camera for Product Photos
- 1.5 Common Camera Modes: Manual vs Aperture Priority
- 1.6 Controlling Light
- 1.7 DIY Product Photography Setup Under $50
- 1.8 Pro Tips for Avoiding Blurry Product Photos
- 1.9 Services & Post-Production
- 1.10 Final Thoughts: Practice, Patience & Post-Production
- 1.11 Frequently Asked Questions (FAQs)
Best Camera Setting for Product Photography: Complete Guide for Sharper, Cleaner, Sell-Worthy Shots
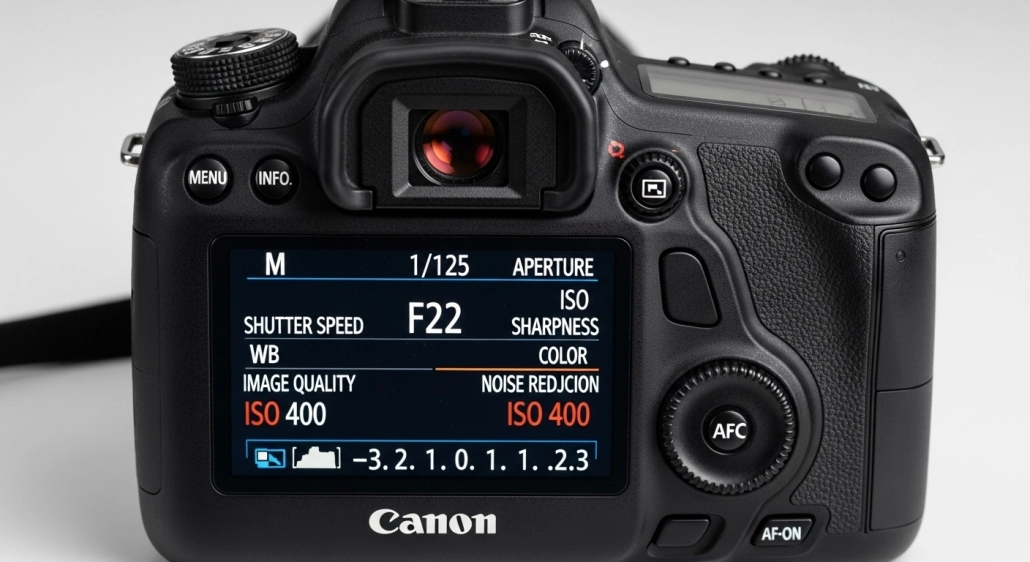
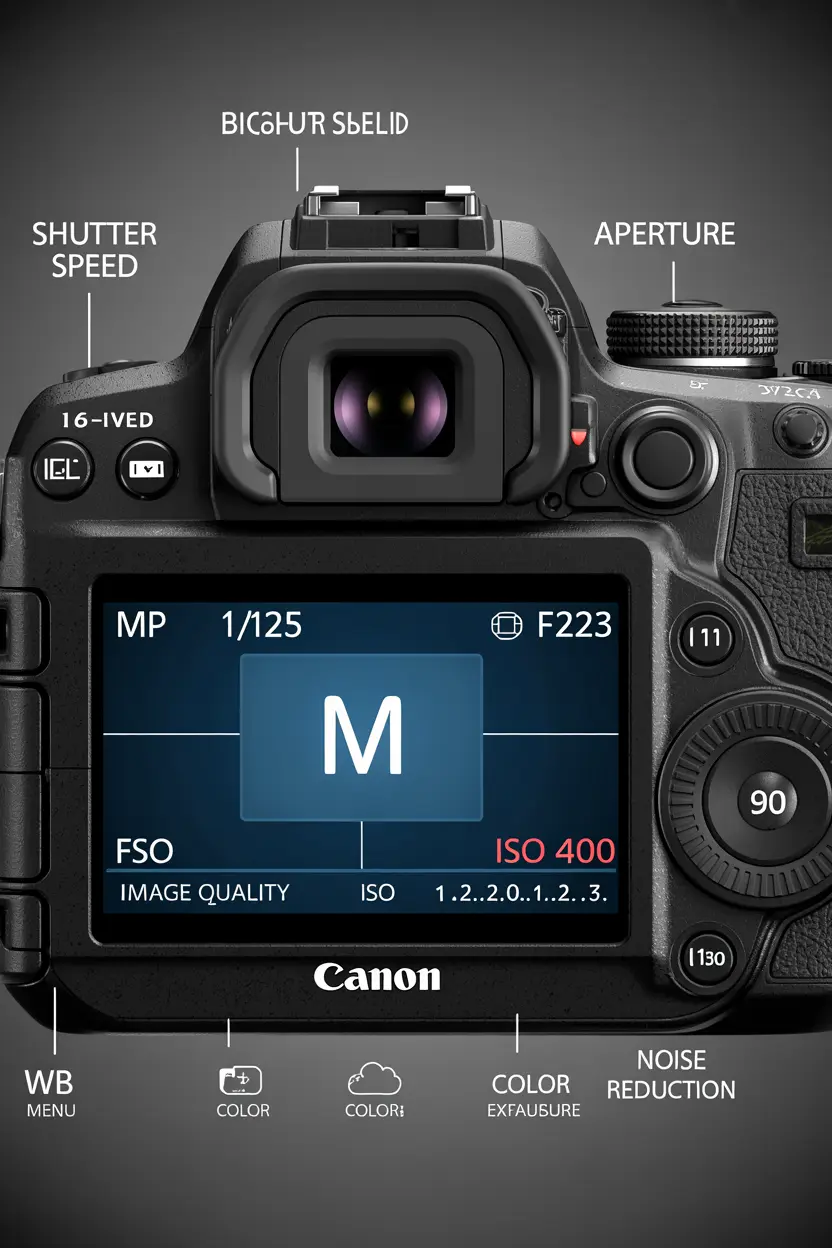
The best camera setting for product photography requires an ISO of 100, an aperture of f/8 to f/16, and a tripod-mounted slow shutter speed. This baseline setup guarantees maximum sharpness. By shooting in fully manual mode and saving files in RAW format, you secure crisp, high-resolution images that make buyers want to click and purchase immediately. Summary: Mast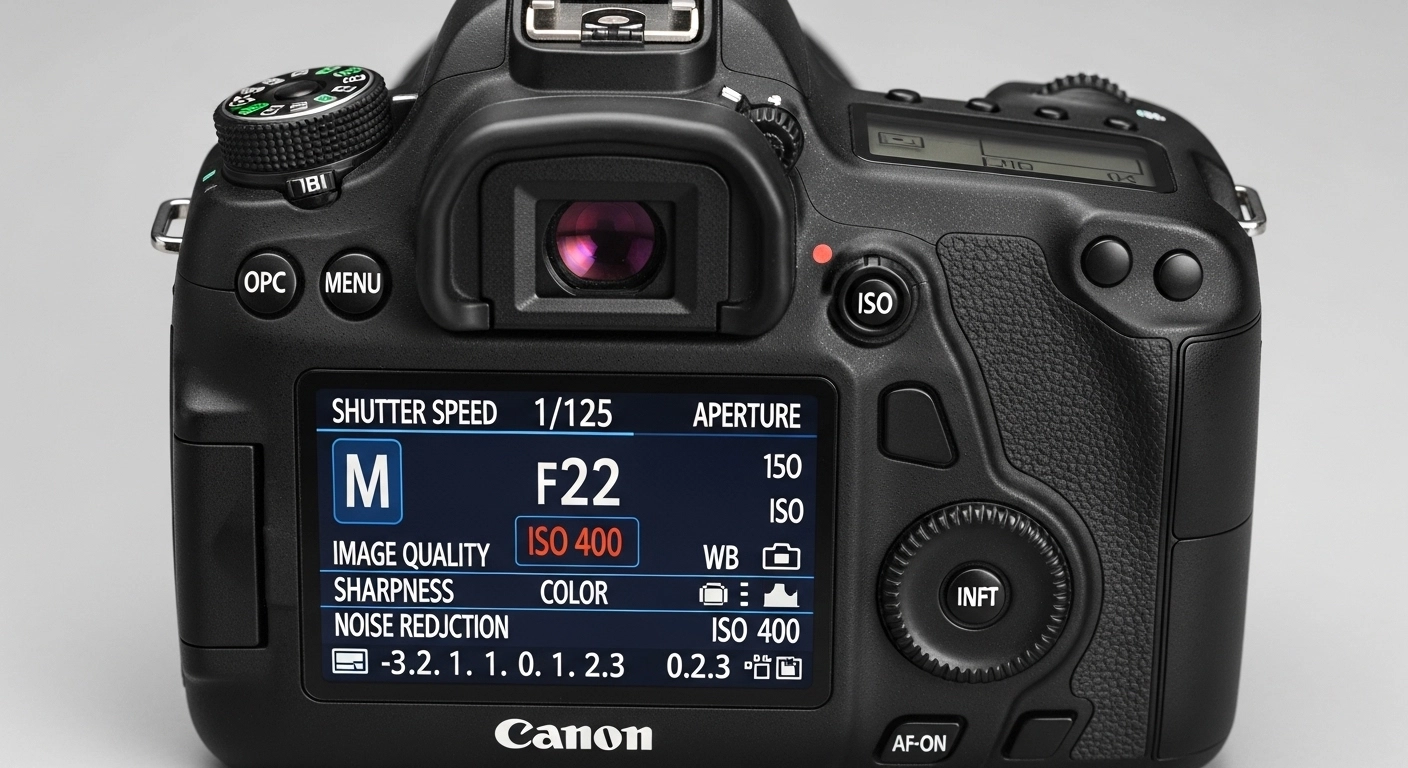 ering these specific manual configurations is the fastest way to elevate your e-commerce visuals from amateur to absolute professional.
Why Camera Settings Matter
Camera settings dictate the precise amount of light, depth, and clarity that reaches your camera’s digital sensor. Settings matter deeply. Without a proper understanding of your best dslr settings for product photography, even the most expensive lighting equipment will produce blurry, dark, or heavily distorted images that deter potential customers. Summary: Correct camera settings form the mandatory foundation for capturing high-quality, conversion-driving product photographs.
How To Set Your Camera’s ISO, Aperture, and Shutter Speed for DIY Product Photography
To set your camera for DIY product photography, switch the dial to “M” for Manual mode to control all variables. The process is simple. First, lock your ISO at 100 to prevent grain, then dial your aperture to f/11 for a deep focus, and finally adjust your shutter speed until the light meter hits perfectly zero. Summary: Taking manual control over these three core pillars guarantees consistent, high-quality results for any DIY shoot.
The Exposure Triangle: ISO, Aperture & Shutter Speed
The exposure triangle is a fundamental photographic concept that links ISO, aperture, and shutter speed to control total image brightness. These elements work together. If you change one specific setting to capture more light, you must inversely adjust at least one of the other two settings to maintain a perfectly balanced exposure profile. Summary: Understanding the exposure triangle is crucial for achieving the best camera settings for photography in any lighting scenario.
| Setting | Function in Product Photography | Ideal Range |
| ISO | Controls sensor light sensitivity | 100 – 200 |
| Aperture | Controls depth of field and focus | f/8 – f/16 |
| Shutter Speed | Controls duration of light exposure | 1/13s to 1/160s (on tripod) |
What Is ISO and Why It Matters in Product Photography
ISO is the numerical value that measures your camera sensor’s artificial sensitivity to incoming light. Keep it very low. Using the best camera settings for indoor product photograph requires a low ISO to completely eliminate digital noise, ensuring that your merchandise retains its vital textures, accurate colors, and premium appearance. Summary: A low ISO is essential because it prevents grainy textures from ruining the clean look of your products.
Best ISO Settings for Sharp Product Shots
The absolute best ISO setting for sharp product shots is ISO 100, or the lowest native setting your camera allows. Lower is always better. While you might be tempted to raise the ISO in a dark room, adding studio lights instead allows you to maintain ISO 100, thereby preserving the ultimate crispness and clarity of the item. Summary: Always default to ISO 100 and add more external lighting rather than increasing your camera’s internal sensitivity.
What Does Aperture Do in Product Photography?
Aperture functions as the physical iris of your lens, opening or closing to control both light intake and depth of field. This controls image focus. A wider opening lets in abundant light but blurs the background, whereas a narrower opening restricts light but keeps the entire product sharply in focus from the front edge to the back. Summary: Aperture is the primary tool used to ensure every single detail of your product remains incredibly sharp.
Ideal Aperture Settings (With Depth-of-Field Tips)
For product photography, the ideal aperture setting ranges from f/8 to f/16 to guarantee a deep depth of field. Use a high number. When you use the best aperture for product photography like f/11, you ensure that intricate details—like the stitching on a leather bag or the prongs on a diamond ring—are fully captured. Summary: Setting a narrow aperture between f/8 and f/16 is the secret to keeping your entire product perfectly focused.
How Shutter Speed Affects Product Image Sharpness
Shutter speed determines exactly how long your camera’s sensor is exposed to light during the image capture process. This impacts motion blur. Because static products do not move, you can use a significantly slower shutter speed to gather more light, provided the camera is securely mounted on a heavy-duty tripod to prevent handshake. Summary: A slow shutter speed lets in necessary light for narrow apertures, but it strictly requires a stable tripod.
Shutter Speed: slow and steady (on a tripod)
A slow and steady shutter speed, ranging from 1/13 to a few full seconds, is perfect for stationary e-commerce items. Tripods are incredibly vital. When searching for the best camera settings for product shoot setups, locking down your camera allows you to use these slow speeds without introducing micro-vibrations that cause frustratingly soft, unusable images. Summary: Always pair a slow shutter speed with a high-quality tripod to achieve perfectly illuminated, razor-sharp product photos.
More Manual Camera Settings
Beyond the basic exposure triangle, several other critical internal camera settings profoundly influence the final quality of your e-commerce images. Details truly matter here. Adjusting your file format, color temperature, and focusing mechanisms ensures your raw images contain the maximum amount of digital data needed for pristine post-production refinement and retouching. Summary: Fine-tuning auxiliary settings like RAW formatting and white balance significantly improves your overall product photography workflow.
Camera Mode: manual
Shooting in fully manual mode is an absolute necessity for achieving professional, consistent, and highly reliable product photography results. Take total creative control. Unlike automatic modes that constantly guess and alter exposures between frames, manual mode locks in your specific settings, ensuring that a batch of fifty product photos looks identically bright and uniform across your entire catalog. Summary: Manual mode gives you the precise control required to maintain strict visual consistency across all e-commerce imagery.
Image Format: RAW
The RAW image format captures all unprocessed digital data directly from your camera’s sensor without any automatic internal compression. Always shoot in RAW. When you utilize the best dslr camera setting for product photography by choosing RAW over JPEG, you retain massive amounts of color information, allowing for flawless exposure corrections and white balance adjustments later. Summary: Selecting the RAW format preserves maximum image data, providing unmatched flexibility during the photo editing process.
White Balance: automatic
Setting your white balance to automatic is often acceptable if you are shooting strictly in the forgiving RAW image format. Colors must look real. However, if you want the absolute best camera setup for product photography, using a custom white balance with a gray card ensures your white backgrounds look purely white and your product colors remain perfectly true-to-life. Summary: While automatic white balance is a safe starting point, custom white balance guarantees absolute color accuracy for brands.
Focus: automatic
Automatic focus is incredibly reliable in modern cameras, especially when shooting high-contrast items in a brightly lit studio environment. Let the camera work. However, when photographing small jewelry or using macro lenses, switching to manual focus allows you to meticulously pinpoint the exact facet or logo that must be overwhelmingly sharp for the viewer. Summary: Use autofocus for general apparel and large items, but switch to manual focus for intricate, highly detailed macro photography.
How to Set Up Your Camera for Product Photos
Setting up your camera for product photos requires a systematic approach to balancing light, stability, and proper internal configurations. Follow steps logically. Start by mounting the camera on a tripod, frame your product, lock your ISO to 100, set your aperture to f/11, and dial down your shutter speed until the digital exposure meter balances. Summary: A methodical camera setup process ensures you never waste time troubleshooting blurry or poorly lit images later.
-
Step 1: Secure the camera on a sturdy tripod.
-
Step 2: Choose the best phone camera settings for product photography or DSLR settings (ISO 100).
-
Step 3: Set your aperture to f/8 or higher.
-
Step 4: Adjust the shutter speed to center the exposure meter.
-
Step 5: Use a two-second timer to prevent button-press shake.
Common Camera Modes: Manual vs Aperture Priority
Manual mode offers absolute control over every setting, while Aperture Priority allows the camera to automatically guess the required shutter speed. Manual always wins out. For the best settings for product photography, manual mode is vastly superior because it prevents the camera from changing the exposure if a white product is swapped for a black one. Summary: Choose manual mode over aperture priority to guarantee consistent, uniform lighting across your entire product catalog.
Controlling Light
Controlling light is the most pivotal skill a product photographer can master, as it directly dictates which camera settings become possible. Light shapes the product. By diffusing harsh bulbs and using white bounce cards to fill in dark shadows, you create a flattering, soft illumination that highlights product textures without causing blown-out, overexposed glaring spots. Summary: Mastering light control allows you to utilize optimal camera settings for the sharpest, most appealing visual results.
Lighting Equipment 101: Why to Invest and What to Buy
Investing in dedicated lighting equipment elevates your product photos from looking like casual snapshots to looking like high-end magazine editorials. Buy continuous lights first. A simple kit containing two softboxes provides consistent, beautiful illumination that makes dialing in the best camera settings for indoor photography incredibly easy, even for absolute beginners building their first studio. Summary: Proper lighting equipment is a mandatory investment that drastically simplifies your camera settings and improves image quality.
Best Guide to Lighting Setups For Apparel Product Photography
Apparel photography demands a large, soft lighting setup to accurately showcase fabric textures, draping, and exact brand colorways. Use big softboxes. Placing a key light at a 45-degree angle and a fill light on the opposite side ensures the clothing looks dimensional, while allowing you to use a narrow aperture for total sharpness. Summary: A balanced, dual-light setup is the proven standard for capturing professional, highly detailed apparel product photographs.
Lighting + Camera Settings: A Match Made in Studio Heaven
When excellent lighting meets precise camera settings, the resulting image requires drastically less time and effort in post-production. They work together perfectly. Strong studio lighting allows you to keep your ISO at 100 and your aperture at f/16, resulting in a virtually flawless raw file that makes subsequent background removal and retouching exceptionally swift. Summary: Combining powerful lighting with optimal camera settings creates the ultimate foundation for efficient, high-quality commercial photography.
DIY Product Photography Setup Under $50
You can build a highly effective DIY product photography setup for under $50 using basic household items and natural window light. This saves massive budgets. By using a white poster board as a seamless backdrop and aluminum foil as a bounce reflector, you can pair the best iphone camera setting for product photography to capture stunning, professional-looking results. Summary: An affordable DIY setup relies on clever light manipulation rather than expensive gear to produce brilliant product images.
Pro Tips for Avoiding Blurry Product Photos
Blurry product photos are usually caused by an unsteady camera, missed focus, or a shutter speed that is far too slow. Stop the blur immediately. Always use a rigid tripod, enable your camera’s two-second delay timer so your hand doesn’t shake the lens, and thoroughly double-check your focus points by zooming in digitally on the camera screen. Summary: Eliminating camera shake through tripods and timers is the most effective strategy for preventing blurry product images.
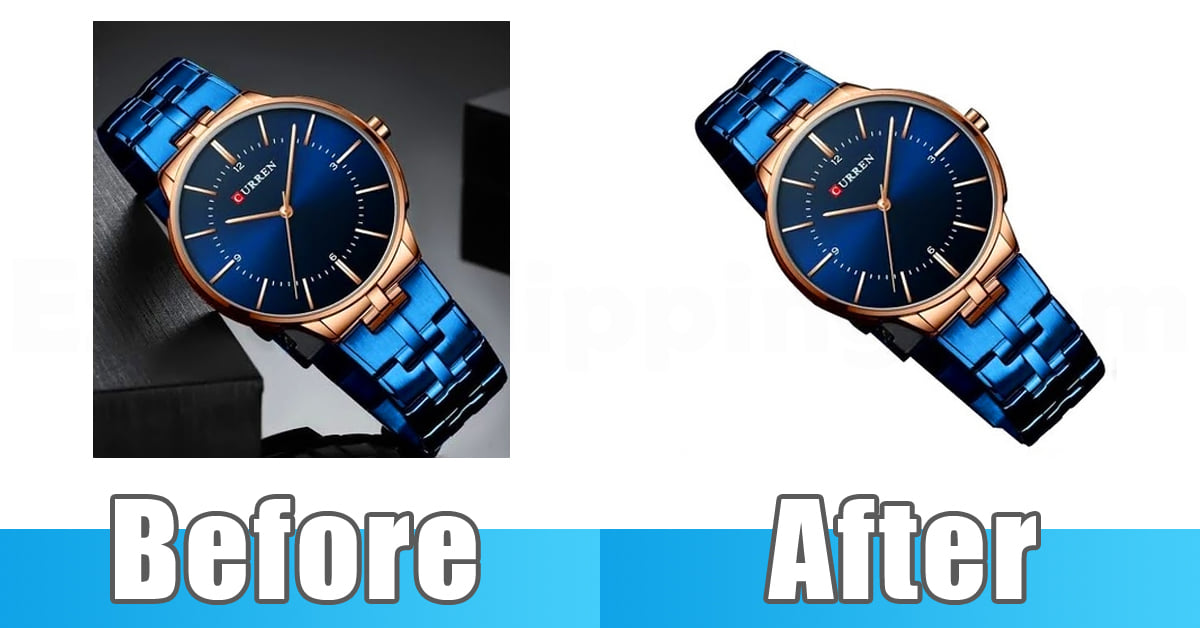
Services & Post-Production
Even with the absolute best camera settings, almost all e-commerce images require professional post-production to meet strict marketplace requirements. Editing is totally crucial. Utilizing an industry leader like Expert Clipping guarantees flawless background removal, precise ghost mannequin effects, and accurate color correction that perfectly complements your hard work behind the actual camera lens. Summary: Professional post-production services refine your well-shot images into polished, marketplace-ready assets that drive massive sales.
11 Proven Ways E-commerce Brands Scale Photo Retouching Without Losing Quality
E-commerce brands scale their retouching by outsourcing bulk edits to dedicated professional teams rather than overwhelming their internal photography staff. Scale up intelligently. By partnering with external experts for tedious tasks like clipping paths and shadow creation, brands can maintain high visual standards while allowing their photographers to focus solely on capturing new, beautiful product imagery. Summary: Outsourcing specialized photo editing is the most proven method for scaling visual content production without sacrificing quality.
Clipping Path vs Background Removal: Which One Do You Need?
A clipping path uses a hand-drawn vector line for perfect precision, while basic background removal often relies on automated AI tools. Precision always wins out. If you are selling items with hard, complex edges like jewelry or bicycles, a manual clipping path is absolutely necessary to avoid the jagged, unprofessional edges commonly caused by cheap AI software. Summary: Choose manual clipping paths for complex items to ensure clean, professional, and highly accurate background removal results.
Final Thoughts: Practice, Patience & Post-Production
Mastering the best camera setting for product photography requires a blend of technical knowledge, hands-on practice, and supreme patience. Keep testing your gear. By consistently applying a low ISO, a narrow aperture, and a stable shutter speed, you will generate outstanding raw files that, when paired with professional post-production from teams like Expert Clipping, yield undeniable success. Summary: Combining optimal manual camera settings with expert editing is the ultimate formula for creating sell-worthy e-commerce photography.
Frequently Asked Questions (FAQs)
What is the best camera setting for product photography overall?
The best camera setting for product photography includes an ISO of 100, an aperture between f/8 and f/16, and a shutter speed adjusted to balance the exposure meter. Using a tripod is mandatory for this setup. Summary: This specific combination ensures maximum sharpness, deep focus, and zero digital noise for your product images.
What is the best aperture for product photography?
The best aperture for product photography ranges from f/8 to f/16. This narrow opening creates a deep depth of field, ensuring the entire product is in focus. Summary: Using f/8 to f/16 guarantees that all important product details remain sharply focused from front to back.
How do I fix blurry product images?
To fix blurry product images, secure your camera on a heavy tripod, use a remote shutter release, and ensure your aperture is f/8 or higher. Never shoot handheld in low light. Summary: Eliminating physical camera shake and increasing your depth of field are the fastest ways to cure blurry photos.
What are the best phone camera settings for product photography?
The best phone camera settings for product photography involve turning off the flash, locking the exposure by holding the screen, and lowering the brightness slider slightly. Use natural window light. Summary: Locking your phone’s focus and exposure prevents sudden lighting shifts, resulting in cleaner, more professional mobile product shots.
Why should I shoot product photos in RAW format?
Shooting in RAW format captures all uncompressed sensor data, providing maximum flexibility to fix white balance and exposure during the editing phase. JPEGs discard this data. Summary: RAW files give professional editors the necessary information to perfectly color-correct and retouch your e-commerce product photos.


Leave a Reply
Want to join the discussion?Feel free to contribute!