Introduction to Image Editing and the Importance of Background Removal
In the current era of digital media, image editing is a must-have skill for photographers, graphic designers and people who want to improve the visuals in their content. Background removal is one of the most important parts of image editing, because it enables you to remove the background and focus on the subject of your photo, resulting in beautiful images. Whether you are a professional photographer or a hobbyist, you will be able to reach a whole new level of image editing by learning how to use a background removal tool.
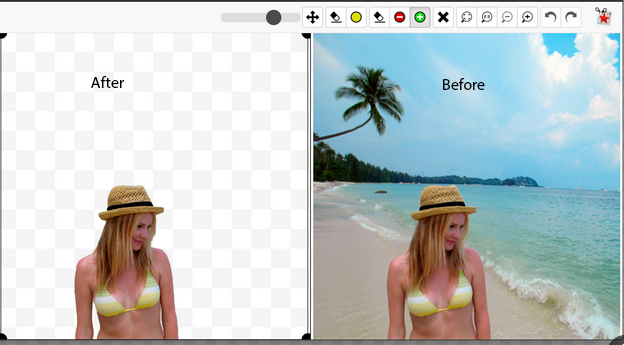
What is Background Removal Tool?
A Background Removal Tool is software or an app that lets you remove the image’s background while keeping the subject. It relies on the most advanced algorithms and techniques to determine the subject from its background, and this makes it easy to replace, modify, or even remove the background entirely. This tool is very useful when you want to make product images having transparent backgrounds, combine multiple images, or just improve the overall look of your visuals.
Popular Background Removal Tools- Available Online
Today, the digital era provides various background removal tools online, which cater to users with different skill levels and requirements. Some of the popular ones include:Some of the popular ones include:
1. Photoshop:
Photoshop from Adobe is the most popular image editing software and provides a robust tool for background removal as well. What makes Photoshop so powerful is the fact that it gives you a wide range of selection and masking tools that you can use to remove the background of the subject and to edit its edges.
2. GIMP:
GIMP is a free and open-source alternative to Adobe Photoshop. It gives a variety of instruments and plug-ins, like a background removal tool, which allows users to be able to edit images without having to purchase expensive software.
3. Remove.bg:
Remove.bg is a user-friendly online tool that works in an intelligent way to remove the background from your images. It employs AI to recognize the subject and subtract it from the background, thus yielding superior results.
Remove the background from photos for free
If you are in search of a free background removing tool, there are lots of alternatives that can help you accomplish the same as a professional without spending money. These tools bring you a lot of features and functions which make it very easy to remove the background from the images.
An example of a free tool for background removal is Remove.bg. The tool is user-friendly and one does not need any experience in image editing to use it. Just upload your image, and Remove.bg’s AI-powered algorithms will automatically detect and remove the background, hence, you will be left with a clean and isolated subject. It is great for quick edits or for times you cannot access the specialized software.
Another choice, GIMP, is also popular. Earlier, GIMP is a free and open-source software for imaging editing that has a lot of features including a background removal tool. With GIMP you can manually select and remove the background, refine the edges and make other edits to get the final result. Even though it might be a bit more labor-intensive than automated tools, it allows for a lot of customizations and control over the editing process.
Background removal with the Photoshop tool
If you are familiar with Adobe Photoshop, the background removal tool can certainly enhance your image editing proficiency. Here’s a step-by-step guide on how to remove the background using Photoshop:Here’s a step-by-step guide on how to remove the background using Photoshop:
- Step 1: Open the Image: Launch Photoshop and bring in the photo that you will be editing. Make sure the Layers panel is visible.
- Step 2: Choose the Tool: Pick the tool that you need and that is most suitable, like the Quick Selection Tool or the Pen Tool, and then select the subject you want to keep. Spend your time and make choices carefully for better outputs.
- Step 3: Refine the Selection: After you make the first selection, go to the “Select” menu and click “Refine Edge.” This will bring up a new window where you can refine the selection by changing parameters like Smooth, Feather and Contrast.
- Step 4: To create a layer mask: After perfecting the selection, click on the “Layer Mask” button at the bottom of the Layers panel. This will give us masked layer which will hide the background and show only the subject.
- Step 5: An additional thing to do is to use a background remover. After removing the background, you can change the colors, add effects, or place your subject on a different background.
Using these steps you can efficiently get rid of the background by means of Photoshop and get the most out of this amazing software.
A Step-By-Step Guide of Background Removal Using a Free Online Background Removal Tool
Background removal from an image is a simple and easy process when you use a free online background removal tool. Here is a tutorial on how to do it in step-by-step.
Remove.bg:
1. Step 1:
Visit Removing.bg: Open your web browser and paste the website address to the Remove.bg website.
2. Step 2:
Click on the “Upload Image” button and choose the image you need to enhance from your computer. As an alternative, you can drag and drop the image to the web page.
3. Step 3:
Wait for the Background Removal: The background removal will be done automatically by the algorithms of Remove.bg after the image upload. It varies with the image size and your internet speed and sometimes it may take a few seconds.
4. Step 4:
The Final Image is Ready for Download: After the background removal is done, you will see a preview of the edited image with the background removed. After you become satisfied with the outcome, click on the “Download” button to save the edited image onto your computer.
Remove.bg takes the hassle out of image background removal, as it is a simple process that can be done in a few minutes and is thus a great option for quick edits or when you don’t have special software.
How to get rid of a picture’s background?
Background removal from an image is a usual task in picture editing, whether you are a professional photographer or just an amateur. By following these steps, you can achieve a clean and isolated subject:By following these steps, you can achieve a clean and isolated subject:
1. Step 1:
Decide the Subject: Choose the Tool in your chosen image editing software that will help you select the subject you want to keep. Clear cuts, with well-defined edges are important.
2. Step 2:
Remove Background: Select the area you want to keep and apply the background removal tool to get rid of the unwanted elements. The method of selecting a specific area may differ depending on the software you are using. Some of the methods include creating a layer mask, using the magic wand tool, or utilizing more advanced selection techniques.
3. Step 3:
Shape the Edges: In this step, the edges of the subject should be refined to have a smooth transition from the subject to the new background, when needed. This can be achieved by utilizing tools such as feathering, smoothing, or focusing the selection.
4. Step 4:
Proceed Editing: With the background removed, you can now go on and edit the image. It can involve changing the colors, applying effects, or putting the object on a different background to create composite photos.
Through these steps, you will be able to remove the background from a picture and open a world of new creative ideas in image editing.
Using Transparent Cutout Backgrounds for Your Photos.
One of the crucial benefits of applying a background removal tool is the functionality to produce cutout transparent backgrounds for your photos. Whether you need an image for e-commerce, marketing material, or just to add beauty to your visuals, a transparent background allows you to do it all.
This can be achieved by taking out the background and saving your image in a format that supports transparency, for example PNG, then you can put your subject in any design or layout without any problems. This versatility gives you the opportunity to place your product on different backgrounds, superpose it over other images, or create attractive compositions that catches the eye.
The best way to do this is by using the steps that were just mentioned to create a transparent cutout background for your photos. After that, you will have to remove the background and sharpen the edges. Choose the PNG format for your image and tick the transparency option. This will keep the transparency of the background to let you easily combine the subject with any project.
Conclusion
Background removal as a tool reflects the art of image editing and the understanding of its power. It doesn’t matter whether you use a paid software like Photoshop or go with free online tools like Remove.bg, the background removal capability will take you to a whole new level of creativity. Through the use of the tutorials provided, you are able to do away with backgrounds from your images, to sharpen the edges and to create amazing visuals that will attract your audience.
Hence, let the background removal tool become your best ally and achieve greater heights in image editing. Experiment, explore, and let your creativity run wild as you get mastery over image editing.